Missing color from an Epson printer usually points to a grayscale setting or a color ink channel that isn't printing. Choose Color in the print settings first, then check the nozzle pattern if the page still comes out black and white.
A full color pattern shows that the printer can print with every ink color. If the cyan, magenta, or yellow section is missing, check the ink supply and print head, even when the tanks look full.
In this guide
1. Choose Color for the job you're sending
Open the document's print window and select the correct Epson printer. Open Properties or Preferences if the app shows only a simplified print dialog.
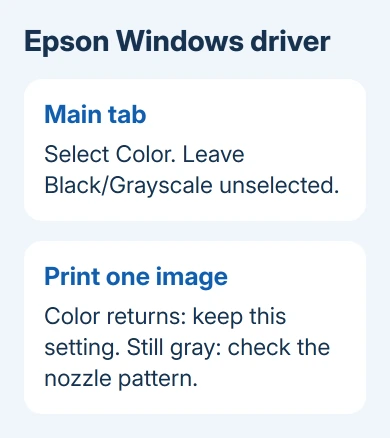
With the ET-2850's Windows Epson driver, the Main tab offers Color and Black/Grayscale. Select Color. Epson says to check the Black/Grayscale or Grayscale setting when printed colors are wrong.
In Windows 11, you can also open Settings > Bluetooth & devices > Printers & scanners, choose the printer, and open Printing preferences. In Windows 10, begin at Settings > Devices > Printers & scanners.
Check the setting in the app when you print again. A saved black-and-white preset can bring the wrong choice back even after another document printed in color.
On a Mac, open File > Print and select the Epson. Expand the dialog with Show Details if that button appears. Look in Print Settings or Printer Features, depending on the driver and app.
Turn off Grayscale or Black & White wherever that option appears. AirPrint and Epson-driver dialogs can look different, so don't expect every Mac to have the Windows Main tab.
Print a small image that definitely contains color. If it now prints correctly, save a color preset for that work and stop there. Ink cleaning won't improve a job that was intentionally sent in grayscale.
2. Compare the document with the printer's own output
Print a nozzle check from the printer's maintenance controls. This pattern checks whether each ink color prints, without using your document or the computer's color setting.
For the ET-2850, load plain paper, extend the tray, and choose Home > Maintenance > Nozzle Check. Press Start. Other Epson models use different menus; check the model's manual before using an EcoTank sequence on a WorkForce.
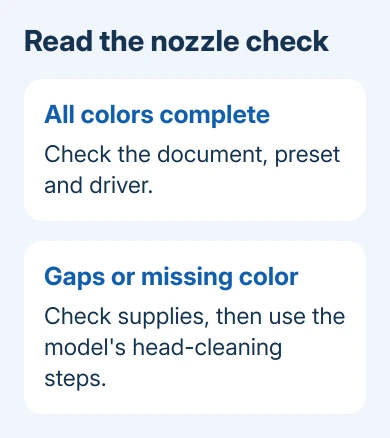
Look for gaps, faint sections, or a missing color. If the pattern is complete, check the app, saved print preset, and driver. If it has gaps or missing colors, continue with the ink and cleaning steps.
A color copy can be a useful extra comparison on a multifunction printer. Select color copying on the device. If the copy prints in color but your computer's document doesn't, a print setting is a stronger suspect.
If sheets are coming out entirely empty, our blank-page repair guide covers that wider symptom. Don't treat an empty sheet as the same thing as a properly printed grayscale document.
3. Check the supplies for your Epson's design
On an EcoTank, inspect the actual ink levels through the tank windows. Each color has its own tank, and a full black tank doesn't tell you whether the color tanks have enough ink.
If colors print but document text disappears, check the Epson black ink channel rather than changing Color mode.
Refill using the correct ink and the instructions for the exact printer. If the printer ran with ink too low to see through the windows, the ET-2850 manual calls for refilling to the upper lines and using its Power Cleaning procedure.
On a cartridge-based Epson, check the ink-status display and any cartridge warning. Follow the model's replacement instructions for an empty or unrecognized color cartridge; EcoTank tank-refill steps don't apply.
For a cartridge-recognition message after replacement, use the Epson cartridge guide. Clearing that message comes before trying to improve color output.
Full tanks or cartridges don't mean every nozzle is clear. If the pattern still has a missing section, follow your model's cleaning steps rather than buying another set of ink immediately.
When trouble began just after topping up, check the refill confirmation before assuming that more bottled ink will restore output.
4. Clean the head when the pattern has gaps
Use the printer's Head Cleaning function, then print another nozzle check. On the ET-2850, the route is Home > Maintenance > Head Cleaning. Follow the display and wait for the cycle to finish.
Do not interrupt cleaning by turning the printer off or opening the scanner unit. The ET-2850's power light flashes during the cycle and stays on when cleaning finishes.
After three failed cleanings on this model, leave it off for at least 12 hours. Recheck the nozzle pattern, then clean if needed. Other Epson models can specify a different count or rest period.
Stop cleaning once the pattern is complete. Running additional cycles once every color is printing uses ink without fixing the app's grayscale preset or an incorrect paper setting.
If your printer's normal cleaning sequence doesn't restore the missing color, check whether that model supports a stronger cleaning function. I'd read its maintenance instructions before borrowing a button sequence from another Epson.
5. Check whether your model supports Power Cleaning
The ET-2850 supports Maintenance > Power Cleaning. It uses a lot of ink, and every tank must be at least one-third full before you start. Running it with low ink can damage the printer.
The model's manual calls for Power Cleaning when the pattern is nearly absent or the normal cleaning sequence hasn't restored printing. Follow its screen prompts, then print a nozzle check.
If quality hasn't improved, switch it off and leave 12 hours or more before the next nozzle check. Another Power Cleaning also requires at least that wait. Don't apply this timing to an Epson model with different instructions.
If your printer doesn't have this feature, follow its own cleaning instructions. Search the exact model on Epson's support page and open its user's guide, rather than looking for an undocumented key combination.
6. Correct wrong shades when every color prints
When no colors are missing but the result looks wrong, match Paper Type or Media Type to the paper loaded. Plain paper and photo paper need different ink settings.
For the ET-2850, try Standard instead of Standard-Vivid in Windows, or Normal instead of Normal-Vivid on a Mac. Let fresh ink dry before comparing the result with your screen.
Printed colors won't exactly match a backlit display. A missing yellow channel and a slightly different shade of blue need different repairs; keep the nozzle pattern as the check that separates them.
If a complete pattern still produces grayscale jobs from several apps, check the installed driver with the Mac printing troubleshooting steps or reinstall the exact Windows Epson package.
If cleaning hasn't restored a color, send Epson support your model, ink type, pattern photos, and the cleaning steps you've tried. Ask about print-head or ink-delivery service rather than running cycles indefinitely.
The Short Version
Select Color first. A complete nozzle check points to software settings; gaps or a missing color point to supplies and the model's cleaning procedure. Use the exact Epson manual for stronger cleaning and waiting periods.
Checked November 12, 2026.