Outlook's simplified account window can hide the server and port controls for a POP or IMAP account. Open Mail in Windows Control Panel, choose Email Accounts, select the account, and click Change > More Settings > Advanced to reach them.
That route is for classic Outlook on Windows. A work Microsoft 365 or Exchange account doesn't use the same manual POP and IMAP setup, so check the account type before changing connection details.
In this guide
1. Open the full account dialog through Control Panel
Open Start, type Control Panel, and open it. Search inside Control Panel for Mail, then open the Outlook Mail item. In Mail Setup - Outlook, select Email Accounts.
Select the account you need to change and check its Type. For a POP or IMAP account, select Change. This opens the server settings you need, rather than just the account's display name or sync period.
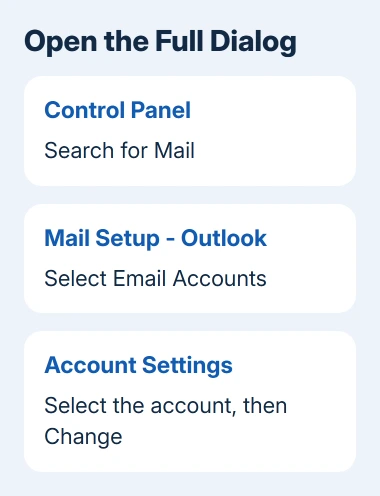
The email account settings procedure includes this Control Panel route for Windows 10/11. Use it when Outlook keeps opening an account-settings window without the controls you need.
Owners who replied to the original question could change their settings again through this dialog. The thread began with Office version 1807, build 10325.20118, but that old build number isn't an update target for a current installation.
If Mail doesn't appear, check that classic Outlook is installed. The new Outlook app doesn't use this classic Mail setup panel. Don't remove your account simply to make the panel appear.
A Send button that vanishes in externally created messages needs a draft-window comparison before another server-settings change.
I'd use this route before recreating a profile. An account with usable mail can still have its settings hidden by the window you're opening.
2. Enter the provider's server names and port settings
Get current settings from your provider or mail administrator. You'll need the incoming server, outgoing server, account type, username, ports, and required encryption. Similar-looking email addresses don't always use the same server.
In Change Account, check Incoming mail server against those details. Do the same for Outgoing mail server (SMTP). Check User Name too; some providers require the full email address rather than the part before the @ sign.
Select More Settings, then Advanced. Under Server Port Numbers, enter the incoming and outgoing port numbers your provider specifies. Set the matching encryption options in the same window.
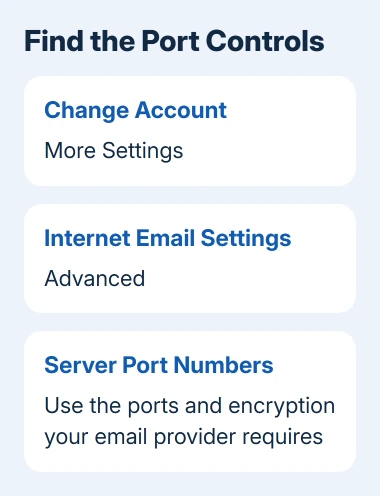
Don't copy another owner's unencrypted configuration. The question involved unusual company-server requirements; another owner restored sending by changing encryption. Use your provider's required security settings for your own account.
Incoming and outgoing settings are separate. Mail arriving successfully doesn't mean the outgoing SMTP connection is correct. If only sending fails, check the outgoing details rather than changing a working incoming server.
For a Microsoft 365 application reporting SMTP 5.7.57 anonymous mail, compare authenticated submission with the approved relay method.
For Oracle mail scripts reporting a certificate error, check the application wallet before editing desktop account ports.
If your provider requires an app password for this account type, use the password it supplies through its account-security process. A normal account password and an app password aren't interchangeable for every service.
3. Test the connection and finish saving the changes
Select OK to leave More Settings. Back in Change Account, choose Test Account Settings when available. Check the result for both incoming access and the outgoing test message.
Green check marks indicate successful tests. Close the test window, then complete Next and Finish. Closing the window too early can leave you unsure whether Outlook saved the changes.
Red markers mean one or more tests failed. Read the error text and compare the failed side with the provider's instructions. Check a rejected password separately from a server Outlook can't reach.
Reopen Outlook and send yourself a fresh message through that account. Then reopen the account settings and verify the values if the original problem was settings that appeared to revert after restarting.
One owner said Repair accepted changes temporarily, then restored the wrong values. Others confirmed that the Control Panel dialog worked. Use the full dialog first rather than repeating that failed repair route.
If sending still fails after the built-in test succeeds, Outlook not sending emails covers the message stage. If the server test still fails, fix the connection settings before troubleshooting individual messages.
A login that fails after a provider password change needs the saved-password checks before changing server ports again.
4. Use Server Settings when your Outlook build offers it
Some versions of classic Outlook let you reach these controls directly. Open File, select the correct account under Account Information, then choose Account Settings > Server Settings if that entry is available.
Expand Incoming mail or Outgoing mail to edit the relevant connection. Finish with Next > Done. Use this route if your version offers it. Otherwise, open Control Panel Mail to reach the settings hidden by the simplified window.
Account Name and Sync Settings is a different panel. It can change the friendly account name and how much mail is synchronized. Renaming the account there doesn't change the server, port, or sender address.
An email alias is also different from a display name. If your goal is sending from a company alias, ask the mail administrator how that address is configured. Changing Your Name won't create a new sending identity on the mail server.
Avoid combining those two jobs. First make the existing account connect with the correct settings. Then check the permitted sender address with the provider, so a delivery problem isn't confused with an alias problem.
5. Check account type and ask for the right support
The manual port procedure applies to POP and IMAP connections. An Exchange or Microsoft 365 work account is managed differently. Ask IT to check its account configuration instead of trying to convert it by entering POP server names.
If you're using new Outlook, its account controls live in that app's Settings. Instructions mentioning File > Manage Profiles or Control Panel Mail refer to classic Outlook. Include the app name when reporting a missing setting.
For a POP account, back up your local mail before support removes the account or replaces its profile. POP can store messages locally that aren't available again from the server. Editing a port doesn't require deleting that mail.
If the settings won't stay saved, give the provider or IT your Outlook version, Windows version, account type, and the value before and after reopening Outlook. Tell them whether you used Control Panel Mail or Server Settings.
For a personal subscription missing that dialog, use Help > Contact Support in Outlook. Ask for help accessing the POP or IMAP account's full settings. If the app won't launch at all, Outlook startup checks address that earlier failure.
The Short Version
Open Control Panel > Mail > Email Accounts > Change, then More Settings > Advanced. Enter the provider's server, port, and encryption requirements, test both directions, and finish saving. Check that this is a POP or IMAP account first.
Checked November 16, 2026.