A folded birthday card in Microsoft Word needs its layout set before adding words and pictures. Use Book fold in desktop Word for a half-fold card, then make four pages: the front, two inside pages, and the back.
Word arranges those pages for printing. Write them in reading order, then print one plain-paper test before using card stock. A template is another option, but its paper size and folding instructions must match the card you want.
In this guide
Which card size and fold should you use?
Decide whether you want a flat greeting, a half-fold card, or a design that folds twice. They use different layouts. The procedure here makes a half-fold card, with four printable faces from one sheet.
A US Letter sheet folded in half makes a card face measuring 5.5 by 8.5 inches. An A4 sheet folded the same way makes A5 faces. Check your envelope and the paper sizes your printer supports before choosing either.
Use File > New in Word for Windows and search birthday card if you'd rather start with a design. On Mac, use File > New from Template. Read the selected template's instructions before replacing its sample text.
Some designs use another fold or several cards per sheet. Don't switch a finished template to Book fold unless you intend to rebuild it. For this four-face card, a blank document gives you a predictable starting point.
Use the installed Word app on Windows or Mac, including Microsoft 365, Word 2024, and Word 2021. Word for the web has different layout controls. Switch to the installed app for Book fold.
Set Book fold before writing the message
In Windows desktop Word, open Layout > Margins > Custom Margins. In the Multiple pages list, select Book fold. Word changes the page orientation to landscape for the printed sheet.
Open the Paper tab and choose the sheet size loaded in the printer. The finished card's page width is half the sheet's width. Select OK to apply the layout before adding the greeting.
On Mac, choose Layout > Margins > Custom Margins, then set Multiple pages to Book fold. Select OK, then check the paper size at File > Page Setup. Use the actual sheet size rather than the folded face size.
Microsoft's Book fold instructions describe the printing arrangement for Windows and Mac. The landscape sheet setting doesn't mean each finished card face must be designed as a wide landscape page.
The Gutter setting leaves extra room at the inside fold for binding. A single-sheet card doesn't need space for a thick spine, but keep text and important picture details away from the fold itself.
Check the margins before inserting pictures. Our guide to adjusting margins in Word explains where those controls are when a layout is too cramped. Use spacing around the greeting rather than pushing words toward the paper edge.
Create the four faces in reading order
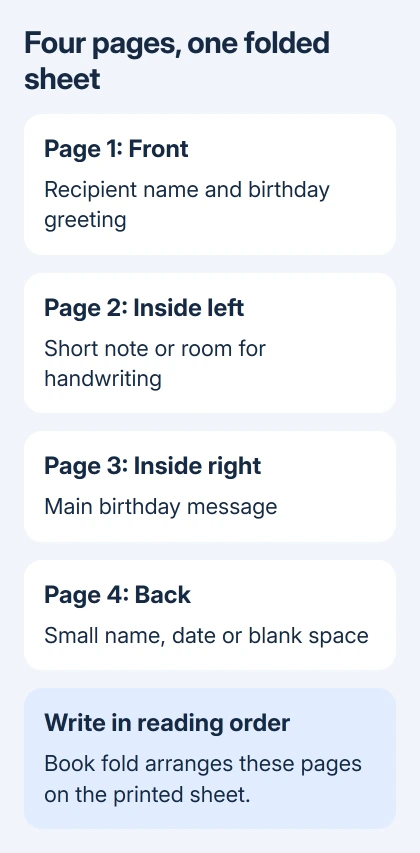
Start with the front cover on page 1. Add the recipient's name, a short birthday greeting, and a picture if wanted. Leave generous space around the main message so it still looks clear once the card is folded.
Insert a page break for page 2, the inside left. Add a short note or leave space for handwriting. Insert another page break for page 3, the inside right, where the main message can go.
Use a final page break to make page 4, the back. A small name or date can help you recognize it in the test print. Keep all four pages, including faces you want to leave blank, rather than removing them to save paper.
In Windows, Ctrl+Enter inserts a page break. In Mac Word, use Command+Return. Page breaks keep the four faces separate when you revise a greeting; repeated empty paragraphs can shift the next face unexpectedly.
Don't manually place page 4 beside page 1 in the editing view. Book fold handles that printed pairing. Build the document in the order someone reads it, then let Word arrange the two sides of the physical sheet.
Use Insert > Pictures to add a picture you have permission to use. Resize it from a corner so it stays in proportion. Check that a large image hasn't pushed its greeting or a page break onto an extra page.
If positioning the artwork becomes awkward, move the picture in Word using the placement option that fits your design. A picture kept with its paragraph is often simpler than several floating objects.
Print a test and check both sides
Save the document, then open File > Print. Check the page preview and the selected paper size. The document should contain the four faces you planned, including any intentionally empty inside or back face.
For Windows manual printing, select Manually Print on Both Sides when offered. Follow the printer's instructions for feeding the sheet back. Booklet printing needs the sheets turned on the short edge to avoid an upside-down reverse side.
On Mac, a printer with automatic two-sided printing can offer Two-sided > Booklet in the print dialog. Use it when available. If your printer can't print both sides automatically, follow its manual feeding steps.
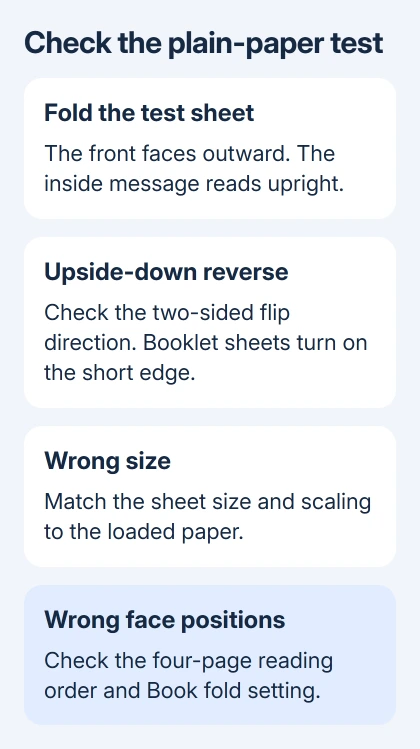
Print on plain paper first and fold the sheet. Check that page 1 is the front, page 4 is the back, and the inside greeting reads upright. Also look for clipped letters and a picture that has crossed the fold.
I'd label the four faces in the first test before using the final artwork. It makes a reversed side or wrong paper feed much easier to recognize than a design with two blank panels.
If the printout is wrong, check the setting that fits the problem. For upside-down text, check which edge the sheet flips on. For the wrong size, check paper and scaling. For misplaced panels, check the page order and Book fold.
Save the design and use suitable paper
Keep an editable .docx copy so you can replace the name and message for another birthday. Save a separate copy for each recipient rather than overwriting the only version of a card that already printed correctly.
Before loading card stock, check the printer's supported paper weight and feed method in its manual. Use its recommended tray and paper setting. A home printer that accepts ordinary sheets may not accept every thick greeting-card blank.
Keep the Word document alongside any export. Ask a print shop whether it wants individual pages or an arranged print file before sending it. Give them the finished size and fold so they can check the layout they need.
If Book fold is missing, check that you're in desktop Word and try a booklet template from its New gallery. If the plain-paper test still prints incorrectly, ask the printer maker about duplex feeding for your model.
The Short Version
Set the paper size and Book fold first. Make four pages in reading order, then let Word arrange the printed sheet. Fold a plain-paper test to check panel order, size, and duplex direction before loading the final card stock.
Checked November 13, 2026.