
A Dell laptop showing Hard Drive - Not Installed can't detect its internal storage. Unplug the dock, USB drives and memory cards, then restart. If the error returns, run Dell's startup diagnostics to check the drive without Windows.
The wording also applies to an SSD. It doesn't mean someone removed a disk, and reinstalling Windows isn't the first repair for a drive the computer can't detect.
1. Start with the laptop connected only to power
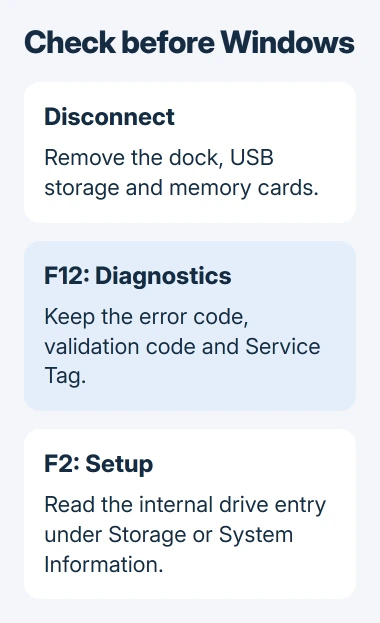
Turn your laptop off, unplug the dock and external accessories, and connect its normal power adapter directly. Remove any USB storage or memory card, then start it again. Keep an external keyboard connected only if you need it.
Dell says an attached storage device can interfere with startup selection in its drive detection instructions. If your laptop starts with those devices unplugged, one of them may be involved.
Status: Dell's storage detection instructions checked November 3, 2026. These checks start before Windows; BIOS menu names depend on the laptop model.
Once Windows loads, reconnect your accessories one at a time. If the error returns with one dock or drive, tell its maker. If the laptop still fails with everything unplugged, continue to the power and diagnostic checks.
If Windows opens even briefly, copy irreplaceable files to separate storage before further repair. I'd save the files first when a drive sometimes goes missing, even if the next restart seems normal.
2. Use the power reset that matches the battery
A power reset clears leftover electrical charge. It isn't Reset this PC and doesn't reinstall Windows. Dell documents it as an early step when your laptop can't detect its drive.
If your laptop's battery comes out without opening the case, shut it down and unplug the adapter. Remove the battery, hold the power button for 15 to 20 seconds, then reconnect the battery and adapter and start again.
For a sealed battery, follow your model's reset instructions. Dell points to its Real-Time Clock reset, but the supported models and button presses vary. Don't open the case to follow the removable-battery steps.
If the drive returns, watch whether it stays visible as you use the laptop. A drive that disappears again still needs checking, even after a successful start. If the message stays, run the startup test next.
3. Run F12 Diagnostics and keep the full result
Turn the laptop on and repeatedly press F12 as the Dell logo appears. In One Time Boot Menu, select Diagnostics and press Enter. Follow any prompts while SupportAssist checks the hardware.
Older models may call this test ePSA. It runs before Windows, which makes it usable when the normal desktop won't load. If Windows starts before the menu appears, restart and begin tapping F12 earlier.
Dell states that you'll need the failed test's error code, validation code, and your laptop's Service Tag when you contact support. Keep them together; a phone photo of the result saves you copying the codes.
If the test fails, the drive or its connection needs attention. A pass means it didn't catch a fault during that test. Since the problem may come and go, check the drive's entry in setup next.
If a mechanical hard drive grinds or clicks repeatedly, stop testing and ask a repair specialist about data recovery. An SSD has no spinning parts, so noise from a laptop with an SSD has another cause.
4. Read the drive listing before changing boot settings
Restart and tap F2 at the Dell logo. This opens BIOS or UEFI setup, the firmware that checks hardware before Windows starts. Look under General > System Information, or Storage on newer models.
Find the internal drive's name or capacity. Check its storage entry: Windows Boot Manager in the boot menu isn't the same thing. Note whether your drive appears, disappears, or shows an unexpected capacity.
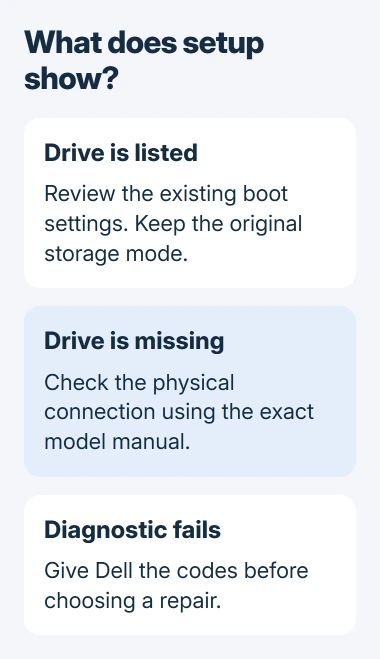
If the drive is missing here, a Windows setting won't make it appear. Continue to the physical connection check. If it's listed, write down your current boot and storage settings before asking Dell to review them.
Don't switch RAID On to AHCI, or UEFI to Legacy, as a general experiment. Dell warns that changing the storage mode used by an existing Windows installation can cause an Inaccessible Boot Device error.
If settings changed just before the fault, put back only a value you know worked. Otherwise, give Dell your model and current settings. Resetting the firmware changes several things at once, making the cause harder to pin down.
Microsoft says a hardware change can also trigger BitLocker recovery. If your laptop is encrypted, keep its recovery key ready for the firmware work.
5. Check the connection through the model's service manual
A drive missing from both setup and diagnostics needs its connection checked. Dell recommends reseating it: disconnecting the drive and firmly reconnecting it.
Use your Service Tag on Dell Support to find the matching Service Manual. Follow its steps to prepare the laptop, disconnect the battery and remove the drive. A thin M.2 SSD and a larger SATA drive use different connectors and fasteners.
If you aren't comfortable opening that model, let a technician handle this step. Ask them to check the storage connector and drive before replacing the motherboard or erasing anything.
After reconnecting the drive, run Diagnostics again and check that setup lists it. If it fails again, give Dell the saved codes for warranty or repair advice. A replacement drive won't have your old drive's files.
6. Check firmware when detection returns but keeps failing
For a drive that keeps disappearing, Dell includes BIOS updates in its repair advice. Get the update for your exact Service Tag, and follow Dell's power and encryption instructions while you install it.
The BIOS update decision guide explains when that change fits. If the drive stays visible but Windows won't start, use the startup failure checks for that later stage.
If the drive remains missing, stop trying Windows repair tools. Give Dell Support the test result and F2 storage entry. Mention any recent drop, repair or update so they can choose the next hardware or firmware check.
The Short Version
Unplug external storage, use your model's power reset, and run F12 Diagnostics. Check the drive entry in F2 setup. If it's missing, check the connection and hardware; if it's listed, have Dell review the boot configuration.

Isaac Smith is the founder and editor of PC Glance, a website that covers computers, laptops, and technology. He is a tech enthusiast and a computer geek who loves to share his insights and help his readers make smart choices when buying tech gadgets or laptops. He is always curious and updated about the latest tech trends.