
Print your Brother printer's Network Configuration Report and look for IP Address. That's the address you need, rather than the MAC address or your computer's address.
The printer can print this report even when your laptop can't find it. The buttons vary by model; the sequence here covers the HL-L2350DW family.
Print the network report from the printer
Load plain paper and let the printer finish starting. Check its model label before choosing the buttons to press. A similar name doesn't always mean the same controls or network features.
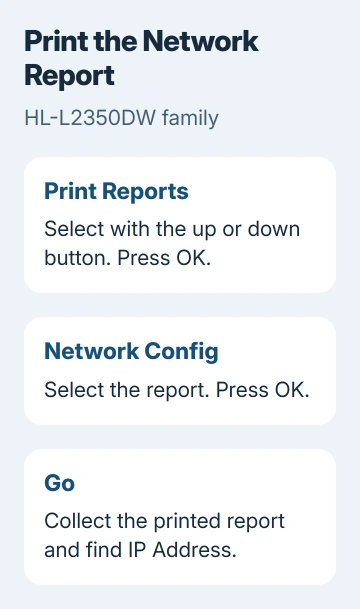
Brother documents the button order in the HL-L2350DW family manual for HL-L2350DW, HL-L2357DW, HL-L2370DN and HL-L2375DW:
- Use the printer's up or down button to select Print Reports, then press OK.
- Select Network Config, then press OK.
- Press Go and collect the printed report.
The same manual covers the HL-L2310D, but that model isn't listed for this report. The report instructions apply to the network models named here.
For another model, use its own Network Configuration Report instructions. A touchscreen may put reports under Settings, while a printer with fewer buttons can use another method.
If your printer isn't connected to a router yet, follow the Brother connection setup first. Printing a report reads the current connection; it doesn't join the printer to your Wi-Fi.
Read the IP address, not the other identifiers
Find IP Address on the sheet. An IPv4 address has four groups of numbers separated by periods; that's the format used in ordinary setup. Copy each group exactly, including any zeros within it.
The manual's example is 192.168.0.5. Use the address on your own report; the example only shows what the format looks like.
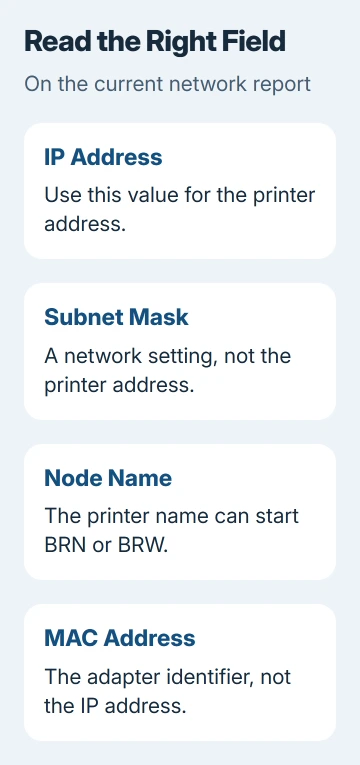
The nearby entries aren't all printer addresses:
| Report entry | What to use it for |
|---|---|
| IP Address | The printer's address on that network |
| Subnet Mask | Part of its network configuration, not the printer address |
| Node Name | The printer's network name |
| MAC Address | The network adapter's identifier |
The node name can start with BRN for wired or BRW for wireless. It's the printer's network name, not its four-part IP address, though some setup tools accept that name instead.
A MAC address has letters and numbers, often with hyphens or colons between them. It doesn't belong in an IP address field, though your router's device list may use it to identify the printer.
If the report has separate sections for each connection, read the one you're using. An address for an unused connection won't help your computer reach the printer.
Check an address shown on the printer's display
On the HL-L2350DW and HL-L2357DW, open Network > WLAN > TCP/IP > IP Address. You can read the address there when you're out of paper or the report won't print.
The HL-L2370DN uses Network > TCP/IP > IP Address for its wired connection. On the HL-L2375DW, choose Wired LAN or WLAN inside Network before opening TCP/IP > IP Address.
These menus also let you change network settings. Leave the address as it is while reading it; saving a different one can break a working connection.
I'd use the printed report when asking someone else for help. It puts the address and connection details on one sheet, saving you from reading several settings over the phone.
Deal with 0.0.0.0 or a 169.254 address
If the report shows 0.0.0.0, wait one minute and print it again, as the manual recommends. The printer may still be waiting for an address after starting or reconnecting.
If it stays at zeros, check the connection you're trying to use. For Ethernet, check the cable at both the printer and router. For Wi-Fi, check the printer's wireless status and network name.
On the wireless models listed earlier, use Print Reports > WLAN Report > OK > Go for a separate wireless report. Check its connection result and any TS- error to learn why Wi-Fi setup failed.
An address starting 169.254 can appear when the printer can't get an address from DHCP, the network service that hands out addresses. The printer can then choose its own address. Its settings call this fallback APIPA.
For a normal home-router connection, check Wi-Fi setup or the Ethernet cable before typing in an address yourself. Copying another device's address can leave both devices trying to use the same address.
Keep the report showing the failure. If a later printout shows a different address, use the new one for setup. Keep both so you can show support what changed.
Use the current address for the next setup step
Use one network for both your computer and printer. Microsoft's printer installation guidance calls for this when adding a wireless printer.
Use the address when a trusted installer or your operating system asks for it. Our wireless printer setup guide covers the next step when automatic discovery misses the printer.
Print another report after moving the printer to a different router or changing its network settings. A photo of an old report may show an address the printer no longer uses.
If your computer still can't find the printer at its current address, send Brother Support the model, connection type and wireless report result. The address can be correct while the print queue still needs attention.
The Short Version
Print Network Config and read IP Address on the current report. Match the button sequence to your model. Wait and reprint for 0.0.0.0; check the network connection for an unexpected 169.254 address.
Checked November 5, 2026.

Isaac Smith is the founder and editor of PC Glance, a website that covers computers, laptops, and technology. He is a tech enthusiast and a computer geek who loves to share his insights and help his readers make smart choices when buying tech gadgets or laptops. He is always curious and updated about the latest tech trends.