A blurry webcam often needs a clean lens, better light or the right focus distance.
Start with the camera's local preview: if that picture is sharp but a video call looks muddy, check the calling app and connection instead of changing the lens.
A soft face, a deliberately blurred background and blocky moving video are different problems. Comparing the local image with the call keeps those cases separate and helps you choose a fix that matches what you're seeing.
In this guide
1. Compare the camera preview with the call
On either Windows 11 or Windows 10, open Start, type Camera, and launch the app. Close the calling app first if it keeps the webcam busy. Select the correct camera if more than one is connected.
Look at your face in the preview with the camera held still. For a saved comparison, take a photo and open it at a sensible viewing size. A tiny call tile can hide softness that becomes obvious when it fills the screen.
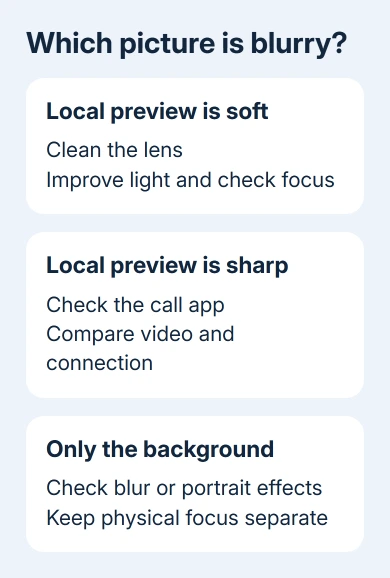
If the local picture is soft too, continue with the lens, lighting and focus checks. If it's sharp locally but poor in the call, move to section 4 and compare the app's selected camera and video settings.
On a Mac, use Photo Booth to compare a local camera image with the call. Keep the same light and seating position for both checks, so a change of room doesn't confuse the result.
The Windows Camera photo steps explain capture and finding the saved image. If the picture is missing entirely, check that your computer recognizes the camera. This comparison is for a picture you can see but that looks soft.
2. Clean the lens and put light in front of you
Check for a fingerprint, dust or leftover protective film over an external webcam's lens. Wipe the outside gently with a clean, dry microfiber cloth. Don't spray cleaner into the webcam or force a privacy slider.
Open any privacy cover fully. A partially covered lens or film can affect the image even when enough light reaches it to produce a recognizable picture.
Face a window or place a lamp in front of you, away from direct glare into the lens. A strongly backlit room can leave your face dark while the camera tries to handle the brighter background.
Dim light can make a webcam image noisy and smeared during movement. Hold still, then move a hand slowly through the picture. If the room is dark and motion looks worse than a still face, improve the light before adding sharpness.
Microsoft lists several causes in its camera troubleshooting steps including a dirty lens, resolution and the call connection. Each needs its own check; resetting the driver won't fix them all.
After cleaning and changing the light, compare the same local preview again. If the face is clearer, keep that position and test the call. If the entire image remains soft, check the webcam's focus method.
3. Adjust focus only in a way the model supports
Some webcams have a manual focus ring; others focus automatically or have a fixed focus. Read the model's own instructions before trying to turn the lens housing on a camera with no focus control.
For example, the Logitech C200 has a manual knob around its lens. Rotate it gently in either direction while watching the preview, stopping where your face looks sharpest at your normal sitting distance.
The C200 focus instructions explain that control. That isn't a reason to twist the lens on every Logitech camera or a laptop's built-in webcam.
With autofocus, move an object away from the lens and give the camera a steady face to focus on. If a hand held close looks sharp while your face doesn't, remove the hand and compare at your normal distance.
For a fixed-focus camera, move back from an object held close to the lens. It can be designed to focus on a seated person while small objects held against the lens stay out of focus.
On Windows 11, open Settings > Bluetooth & devices > Cameras and select the connected camera. Available controls depend on that camera. A missing focus or sharpness control doesn't mean Windows has failed to install it.
The Windows camera settings reference lists optional image controls. Your camera maker's software may offer extra settings that don't appear on that Windows page.
4. Correct a sharp preview that becomes poor in calls
Open the meeting app's Video or Camera settings. Confirm it's using the webcam that looked sharp in the local test. Check for separate entries for the laptop lens, USB webcam and any virtual-camera software.
Remove digital zoom or an unnecessary crop for the comparison. Enlarging a small part of the picture makes limited detail easier to see. Keep the original framing while you check whether quality improves.
Check the app's video-quality or HD option if it offers one. Available resolution can depend on the camera, application and meeting, so a higher setting doesn't mean every call will use that resolution.
If movement becomes blocky or the picture changes quality during the call, pause large uploads and test a stable connection. Compare with another call or participant where practical.
A clear local image points away from lens cleaning as the remaining fix.
If only the background is soft while your face stays clear, turn off the calling app's Background blur, Portrait or similar effect. The label depends on the app and platform. This effect is separate from the webcam's physical focus control.
I'd compare a local recording before buying another camera. It tells you whether the same hardware can make a clear image before the meeting app processes and sends the video.
5. Check software changes, then the camera itself
If quality changed immediately after an update, check the camera's selected resolution and processing controls first. Restart the computer and compare the local preview again before removing a working driver.
For Windows 11, check Settings > Windows Update > Advanced options > Optional updates for an offered camera driver. If a separate driver package is offered, get the one made for this camera from its manufacturer.
On Windows 10, use Microsoft's optional driver path: Settings > Update & Security > Windows Update > View optional updates > Driver updates. Select a camera driver if one is offered.
For a camera that disappears or stops producing a picture, use the webcam detection and permission checks. Permission switches won't sharpen a live image that's already reaching the app.
If an external webcam still looks soft in good light, try it on another computer. If the same lens stays blurry there at its supported distance, ask the manufacturer to check for a focus problem or lens damage.
Give support the model, a local sample, the app used and whether another computer changes the result. For a built-in webcam, send those results to the laptop manufacturer and ask about camera module service.
The Short Version
Compare the local preview with the call. Clean the lens, light your face and use the model's supported focus control. A clear local picture with a poor call needs app or connection checks; background blur is a separate effect.
Checked November 15, 2026.
 If you have any business, I can build it online