A MacBook that still opens normally can install macOS through Software Update. For a Mac that won't start, or when you want to reinstall its current system, use macOS Recovery instead. Neither route requires erasing the disk first.
The choice matters: upgrading installs a newer compatible release, while Recovery can replace the system already on your Mac. Decide which you need before downloading an installer.
In this guide
Choose between an upgrade and a reinstall
Check About This Mac, available from the Apple menu. Note the MacBook model, the installed macOS version and whether the window lists a Chip or an Intel Processor. That last detail changes how you open Recovery.
For a newer system on a working Mac, use Software Update. For a damaged installation, use Recovery. An older installer is a separate choice, usually for software compatibility or preparing installation media.

Make a backup before installation if your files are accessible. A normal reinstall keeps apps and personal data, but a backup protects them if the drive has a separate problem. Follow the Time Machine setup steps if you haven't made one.
Plug in the charger and check the internet connection. Don't choose Disk Utility's Erase command as part of a routine reinstall. Erasing is a different job and removes the contents of the selected volume.
Install a compatible upgrade through Software Update
On recent macOS versions, choose Apple menu > System Settings > General > Software Update. On older versions with System Preferences, open Software Update there instead.
Give Software Update time to check. It offers releases that work with your MacBook. An older Mac can report that it's up to date even when newer Mac models can install a later major version.
Select the available Update, Upgrade or Restart Now button, then follow the prompts. The label depends on the offered release and how far the download has progressed.
Enter the Mac's administrator password when requested. Use your Mac login password here, not your Apple Account password.
Apple recommends Software Update as the simplest starting point. The installation options explain how it checks compatibility and why its download may need less storage.
If no update appears, confirm the model's compatibility before looking for another download. Reopening Software Update or pressing Command-R checks again. It won't make an unsupported release compatible.
Keep the lid open through installation and its restarts. Restarts may repeat the progress bar or briefly leave the screen blank. Don't interrupt it just because the screen changes.
When the desktop returns, check About This Mac again. The version listed there confirms what installed. Then open the apps you depend on before considering the upgrade finished.
Reach the utilities on Apple silicon
Shut down the Mac. Keep Power pressed while it starts. Let go only after startup options appear. On a Touch ID-equipped MacBook, use that button for Power.
Choose Options, then Continue. If prompted, select a volume and an account whose password you know, then enter that Mac login password. The utilities window includes the macOS reinstall option.
Follow this procedure if the Chip entry in About This Mac names Apple silicon. The Intel keyboard shortcuts in the next section aren't the way to open Recovery on these MacBooks.
On Apple silicon, Recovery offers an up-to-date installer for the macOS family last installed. Erasing after an upgrade can affect which release is offered, so read the installer name before continuing.
If startup options never appear, use the MacBook Recovery instructions to check the shutdown and button sequence. Getting to the utilities window comes before choosing an installation disk.
Use the right Recovery keys on an Intel MacBook
Start the Mac, immediately pressing Command-R. Release when a startup screen appears, such as the Apple logo. This starts the built-in Recovery system when it's available.
An Intel Mac offers different installation choices through its startup keys. Command-R offers an updated installer from the last macOS family installed. Use it when replacing the system already on the machine.
Option-Command-R may offer the latest macOS compatible with your Mac. Shift-Option-Command-R may offer the macOS that came with it, or the nearest release that remains available. Those options use Internet Recovery.
The rotating globe indicates that Recovery is loading through an internet connection. Join a network when asked. An exclamation mark on that globe indicates Internet Recovery failed, often because of the connection.
For that failure, try another network or Ethernet where available. A hotel network that requires a browser sign-in can interrupt this process. If the network error returns, switch connections before trying the installer again.
Select the system disk and let installation finish
In Recovery, select Reinstall macOS, then Continue. Follow the agreement and disk-selection prompts. If the installer asks you to unlock the disk, enter your Mac login password.
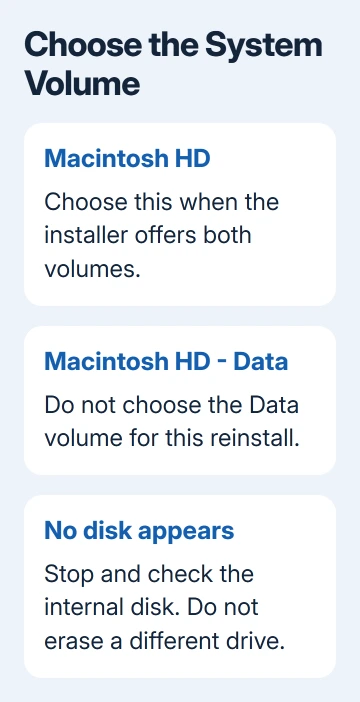
When both Macintosh HD and Macintosh HD - Data appear, choose Macintosh HD. The Data volume isn't the installation target for this procedure. A renamed disk will have its own name.
Keep the Mac awake, plugged in and open until installation finishes. It can restart several times. A setup assistant may appear afterward; complete it when keeping the Mac for yourself.
If your disk isn't listed, stop at that screen. Check the missing drive instead of guessing which volume to erase. Record what Disk Utility can see and whether the internal storage appears at all.
I'd keep a reinstall and a clean install as separate decisions. Replacing macOS to repair it doesn't require wiping your documents, and a missing disk isn't a reason to erase another drive.
When an older installer or further help is needed
For an older macOS release, use the version links on the official download page. Some open the App Store; older releases download a disk image. Use Safari if the links don't open as expected.
A downloaded .dmg can contain a .pkg that puts the actual macOS installer in Applications. Installing that package prepares the installer app; it doesn't finish installing macOS by itself.
Open the resulting Install macOS app to begin. A dimmed Get button or an incompatible-device message means the download route or Mac doesn't meet that release's requirements. Don't work around it with an unrelated installer.
If installation still fails, ask Apple Support about Mac startup or installation. Tell them your model, the installer version, the error and whether Recovery sees the disk. These details help them choose software repair or service.
The Short Version
Use Software Update for a compatible upgrade on a working MacBook. Use Recovery for a reinstall, with the power button on Apple silicon or startup keys on Intel. Install on the system volume and keep the Mac powered until it finishes.
Checked November 15, 2026.
 If you have any business, I can build it online