Transparent images on an iPad need the background hidden and a format that keeps transparency. Export the artwork as PNG, save it to Files, and import that file. A JPEG or screenshot can't recover missing transparent pixels.
A white background in a preview doesn't always mean the file has changed. Place the image over a colored background in an editor first. If color shows around the artwork, it's still transparent; the preview was displaying it against white.
In this guide
1. Test the saved file over a colored background
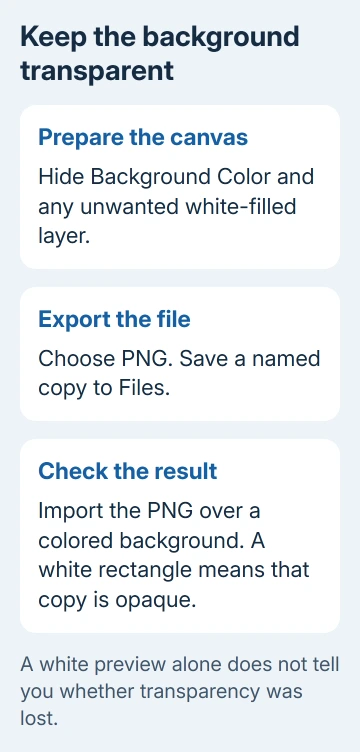
Open the app where you intend to use the image. Make a new document or slide with a strong background color, then import the saved file as an image. Don't use a screenshot of its preview.
If the color reaches the edges of the subject, your file still has transparent pixels. If a solid white rectangle covers the color, that copy has a solid background instead of a transparent one.
This comparison also separates white artwork from a white background. A white logo may seem invisible in one preview, yet appear correctly as soon as you place it over a dark color.
Keep track of which copy you're testing. The original in Files, a picture saved to Photos, and an image received through another app can be different files even when their thumbnails look alike.
If the original passes but a shared copy fails, skip to section 4. If the original itself has the rectangle, correct the artwork and export settings next.
2. Hide the artwork's background before exporting
In Procreate, open the artwork and tap Layers. Find Background Color and turn off its visibility checkbox. Also check for a white-filled layer under your subject; hiding Background Color won't hide a separate painted layer.
Procreate's layer instructions describe hiding Background Color to create transparent artwork. Keep the working document so you can change layers again later.
Then open Actions > Share > PNG. Choose Save to Files in the sharing sheet, select a folder, and save it under a clear name such as logo-transparent.png.
Import that new PNG over the colored test background. If it now works, the source canvas or export was responsible. An iPad reset or unrelated Photos setting won't fix the artwork's background.
In another drawing app, look for the document's background layer or an export option labeled transparency. The exact control depends on that app. Choosing PNG alone won't remove a white rectangle already painted into the image.
I'd keep the editable project and the final PNG together in Files. The project keeps your layers; the PNG is the copy to insert into another document. They serve different purposes.
3. Choose PNG rather than a new file extension
Check the actual export format, not just the filename. Renaming picture.jpg to picture.png changes its label, not its contents. Return to the original editor and export a new file in the required format.
PNG can keep transparent areas, but it can also hold an image with a solid background. The useful combination is a transparent canvas plus a PNG export. Neither part fixes the other automatically.
In Pixelmator Pro on iPad, reveal the menu bar, choose File > Export, then select PNG from the format menu. Adjust the export settings you need, tap Export, and choose the destination.
Apple's export format guide lists PNG with transparency enabled. That's the format to choose for an image that must sit over another background.
In iPadOS 26's Preview app, open the image, tap the Actions Menu button beside its filename, and choose Export > PNG. This changes the format, but it won't erase a background that's already part of the picture.
If you only have a JPEG with a solid background, look for the original project or transparent download. Otherwise, remove the background in an editor, check the edges, and export a fresh PNG. Resaving the JPEG won't restore transparency.
4. Keep a file copy through the sharing step
Use Save to Files from the editor's export sheet so you have one named export to follow. Open Files > Browse, go to the folder you selected, and confirm the file is present before leaving the editor.
To move it into another app, use that app's file import or insert command and select this PNG. For an email or upload, attach the file from Files rather than taking a screenshot of the picture.
A screenshot records the displayed background along with the artwork. If the screen showed white around your subject, that white becomes part of the screenshot. It isn't a way to copy transparent pixels.
If a sharing app offers image sharing and a file attachment, try attaching it and test the received file. This checks whether sharing changes the image, without assuming Photos caused the problem.
If the export is missing from its folder, check Files separately. A file that didn't save or download needs a storage check before a transparency check can tell you anything.
5. Check the destination app with the same PNG
Import the PNG into a second editor that supports transparent images. Use the same file from Files, not another export made with different settings. Repeat the colored-background test there.
If the second app displays it correctly, focus on the first app's import and export options. It may be placing the image on a solid-colored page or exporting the finished document with a background.
A white page underneath an image is also different from a white rectangle inside the image. Move the image partly over another colored object. The overlap shows whether the white belongs to the document or travels with the picture.
For images created on a Windows computer, remove the background before transferring the file when the original already contains one. Copying that file to an iPad won't make its background transparent.
If the PNG fails in two editors, reopen the source project and check its visible layers. If it passes in one app but fails in another, send the destination app's support team the sample PNG, app version, and the steps you used to import it.
Ask how to keep the PNG's transparent background during import and export. Include screenshots of the colored-background test and attach the actual PNG as a file. Support can check the file and see how it looks in your document.
The Short Version
Hide the canvas background, export PNG, and save a named copy to Files. Test it over a colored background before blaming the preview. If only a shared or imported copy gains a rectangle, follow that exact sharing or destination-app step.
Checked November 12, 2026.
 If you have any business, I can build it online