The macOS launcher microphone permission error means Simple Voice Chat can't ask for microphone access. Use Prism Launcher, or select CurseForge Launcher in CurseForge's Launcher Settings to skip the vanilla launcher.
A microphone that works in Discord can still fail here. macOS grants access to apps separately, so the game needs its own working permission request.
In this guide
1. Use the CurseForge launcher setting first
If you're already using CurseForge, close Minecraft and open the CurseForge app. Go to Settings > Game Specific > Minecraft, scroll to Launcher Settings, and select CurseForge Launcher.
Launch your Minecraft profile again. Skipping the vanilla launcher lets the voice chat mod request microphone permission. Watch for the macOS permission dialog when voice chat starts, and allow access for the intended app.
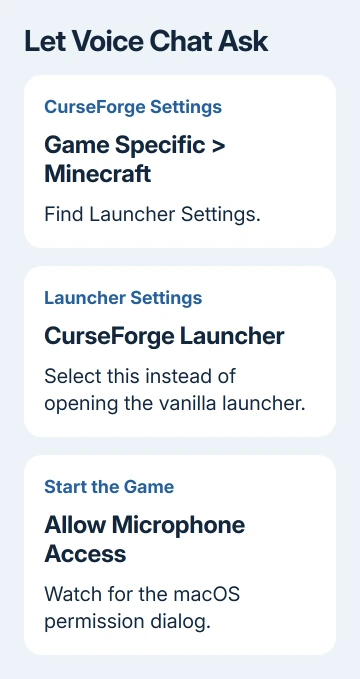
The Simple Voice Chat developer's macOS permission instructions give this specific CurseForge alternative. You're changing how the profile launches; your working microphone can stay connected.
Rejoin the server and check whether the launcher-permission message has disappeared. If it has, continue with the microphone check in section 4. If voice chat still doesn't work, you may need to select the microphone or unmute it.
If your launcher has no matching setting, don't search unrelated game settings for it. Use a supported launcher instead. The permission instructions list Prism Launcher as recommended and GDLauncher as another supported option.
2. Move the game setup to a supported launcher
Before switching, keep a copy of your worlds and the current profile's mod list. A new instance is a separate game installation. It won't automatically bring all your existing worlds, mods and settings with it.
Open the Prism Launcher macOS download page. Its current supported download requires macOS Monterey or later. Choose Apple menu > About This Mac if you're unsure which macOS version is installed.

Download the Universal (.zip) package, open it, and drag Prism Launcher into Applications. This universal package supports both Apple silicon and Intel models; the microphone permission steps are the same on both.
On an older Mac system, the newest download may not launch. The page points to older unsupported versions. Check whether the Mac can run a supported macOS release before choosing an old launcher.
Set up or import the Minecraft instance you intend to play. Use the Minecraft, mod loader and Simple Voice Chat versions your server requires. The game and mod combination still needs to be compatible in the new launcher.
Keep the old profile until the replacement can load the intended world or server. I'd check that the new instance works before tidying the old one, especially if it holds a single-player world you care about.
Start Minecraft from the supported launcher and join a voice-enabled server. Allow the microphone request when it appears. If no request appears, check the permission list next rather than reinstalling the mod repeatedly.
3. Enable the permission macOS has already recorded
On macOS Ventura or later, open Apple menu > System Settings > Privacy & Security > Microphone. Find the launcher or app associated with the request and turn its microphone access on.
On macOS Monterey, open Apple menu > System Preferences > Security & Privacy > Privacy > Microphone. Check the box for the app, unlocking that settings pane if it asks for administrator approval.
Apple says microphone access is controlled per app in Mac privacy settings. Allowing a voice-call app to use the microphone doesn't give the launcher or Java game access too.
After changing access, fully quit Minecraft and reopen it through the same supported launcher. Follow any restart prompt shown by macOS. Rejoin the server and try the mod's microphone test.
If you can't find the app in that list, its permission request may never have reached macOS. Return to the launch method: the vanilla launcher doesn't gain this support just because the Microphone settings page is open.
This is also why buying a USB microphone isn't the first repair. A launcher that can't request permission can block the built-in microphone and an external one in the same way.
4. Select and test the microphone inside voice chat
Once the permission error is gone, open Simple Voice Chat's settings. Use its assigned voice chat key from Minecraft's key bindings if the expected shortcut doesn't open the menu. Choose Select Microphone and select your intended input.
Choose Enable microphone testing and speak normally. Wear headphones to stop speaker sound feeding back into the microphone. If you hear the test, the mod is picking up your microphone. Then ask someone on the server to listen.
Check whether voice chat is muted. If you chose voice activation during setup, the mod automatically mutes the microphone afterward. Even after allowing microphone access, you may still need to unmute before other players can hear you.
If the input is missing, inspect System Settings > Sound > Input and compare the available microphones. If the microphone appears there, macOS can see it. Check which input the mod is using next.
When the whole Mac also has audio trouble, use the Mac sound checks for that broader issue. For this permission error, focus on the app that couldn't request microphone access.
5. Report a connection failure separately from permission
If local microphone testing works but other players still can't hear you, check that you're connected to the server's voice chat and aren't muted. A server connection failure can remain after the Mac permission issue is fixed.
Ask the server administrator if voice chat works for other players. If several players fail, ask them to check the server settings and UDP voice traffic. Repeating Mac permission changes won't open a server's voice port.
If launching the game restarts the whole Mac, use the unexpected Mac restart checks first. The game needs to stay open and join the server before you can test voice chat.
If the warning continues, give the mod's support channel your launcher, macOS, Minecraft, mod loader and Simple Voice Chat versions. Take launcher installation or setup problems to the launcher's own support channel.
The Short Version
Use CurseForge's launcher mode or a supported launcher such as Prism, then allow its microphone request. Select and test the input in Simple Voice Chat. If that works but server audio doesn't, check the voice connection.
Checked November 10, 2026.