Samsung Cloud backs up a Galaxy's supported messages, call history, and settings, but not Gallery photos and videos. Use a photo backup service too, and check that both jobs finish before replacing or resetting the phone.
Google backup is another option for device data. Whichever service you choose, check that your settings, pictures, and important files each have a copy you can recover from the right account.
In this guide
Choose where each kind of data will go
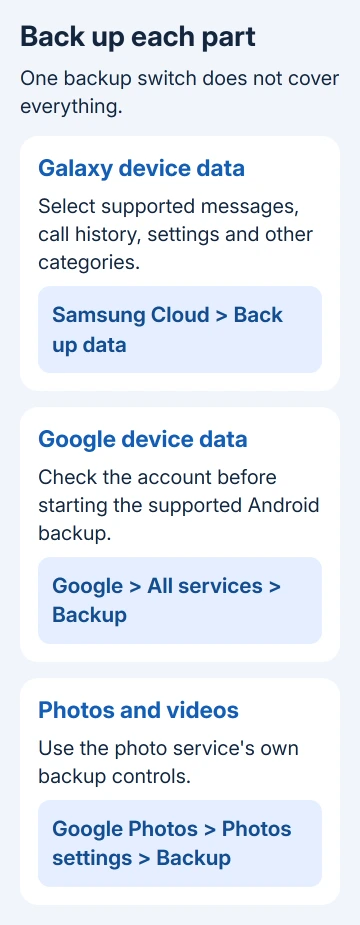
Open Settings > Accounts and backup on your Galaxy. Depending on your model and software, you may see separate Back up data entries for Samsung Cloud and Google Drive. Check the heading before tapping one.
Samsung Cloud handles the categories offered on your device, such as messages and settings. Google backup saves supported Android device data to your Google Account. Google Photos handles pictures and videos through its own backup controls.
You can also copy individual files to a cloud folder. Turning on device backup doesn't mean a PDF in Downloads has been uploaded, so check where that file is saved separately.
I'd start with the things you can't replace: recent pictures, messages, and documents you created. A saved home-screen layout is helpful, but it won't replace a missing family video or an unsent recording.
The Android backup coverage explanation describes the difference between device backup and an app's own data. That distinction matters for apps that keep information in their own accounts.
Save a Samsung Cloud backup now
Sign into your Samsung account on the phone. Open Settings > Accounts and backup, then select Back up data under Samsung Cloud. On another supported layout, select your Samsung account at the top, then Samsung Cloud > Back up data.
Select the categories you need, then tap Back up now. Keep the phone connected until the job finishes and tap Done when offered. Check the completion details rather than leaving as soon as the progress indicator starts.
Available categories can include call history, messages, device contacts, calendar entries, clocks, settings, home-screen information, apps, and voice recordings. The actual selection varies by model, software, country, and carrier.
Samsung's cloud backup instructions say files larger than 1 GB can't be backed up to Samsung Cloud. Check another storage route for an important recording or file that exceeds that limit.
The Apps category doesn't save everything inside every app. Check your essential apps for their own account sync or backup option, especially authenticators and messaging services.
Contacts and calendars stored in a Google account are separate from the device-stored categories. Check the account shown inside the contacts or calendar app instead of assuming every entry belongs to Samsung Cloud.
When you're ready to recover data on another Galaxy, follow the Samsung Cloud restore procedure to choose the saved device and categories. You'll need a completed backup to restore from.
Turn on automatic backup and check its conditions
On the Samsung Cloud backup screen, enable automatic backup for the categories you need. Leave the phone charging, connected to Wi-Fi, and with its screen off so automatic backup can run.
Don't assume an automatic backup ran just because you opened the backup screen earlier. After leaving the phone ready for a backup, return to that screen and check the saved details for your chosen categories.
If a switch or Samsung Cloud itself is missing, check your model and carrier's support information. The options vary between phones, so don't reset yours just to match a screenshot from another Galaxy.
For a phone without that option, use the Google route for supported device data and a separate photo service. A missing Samsung Cloud control doesn't prevent every form of online backup.
Add or check the Google device backup
On Galaxy layouts that show it, open Settings > Accounts and backup > Back up data under Google Drive. Check the Google Account selected, then choose Back up now for an immediate backup.
The current Android route is Settings > Google > All services, then Backup under Backup and restore. There, select Back up now. Some screens label the initial Google page Google services.
Check that the backup uses your account and that you can sign into it from another device. If it uses a former employer or school account, select the account you want before relying on that saved copy.
The Google backup instructions allow as long as 24 hours for the job. Check the backup screen again rather than assuming a slow first run failed after a few minutes.
Use a PIN, pattern, or password screen lock to help protect backed-up data. Keep that screen-lock information available for recovery, along with the Google account credentials.
To transfer all supported data, your replacement phone needs the same Android version or a newer one. An older Android version can't restore the data backed up by a newer version.
Back up photos and videos separately
For the Google Photos route, open Google Photos, then select your profile picture (or initial). Choose Photos settings > Backup, select the intended account, and turn Backup on. Read its status when the upload finishes.
The selected Google Account's storage is shared with services including Gmail and Google Drive. A full account can stop new uploads even when your phone has plenty of free local space. Check cloud space when recent photos remain waiting.
Check Back up device folders in the backup settings for pictures saved outside the camera folder. Screenshots and images from other apps may need their own folder switches. Choose the folders you actually want uploaded.
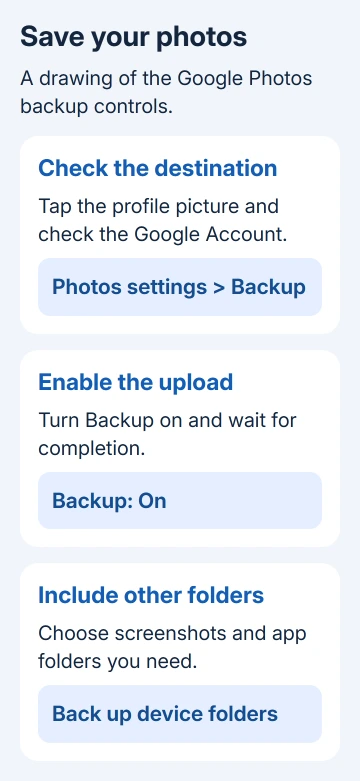
Before erasing the phone, inspect a recent photo's backup details in Photos. Don't delete local pictures as a test of whether backup works. A deletion inside a synced photo app can affect the cloud copy too.
Samsung Gallery's direct link to OneDrive ended on September 30, 2026. Some Samsung help text still describes the old link. Use OneDrive's own Camera backup for new uploads instead.
Open OneDrive > account profile > Camera backup, check the account, and turn it on. Grant photo and video access when prompted. The Gallery sync change notice explains the replacement.
Pictures already in OneDrive remain available in its app or website. Their disappearance from Samsung Gallery after the change doesn't mean those cloud copies were deleted.
Check what is still missing before a reset or trade-in
Open My Files and review Downloads, Documents, and any folders you use for work. Copy important files through your chosen cloud-storage app if they aren't covered by the backup categories. Verify the uploaded file in that app.
Check essential apps separately for account access and recovery instructions. A phone backup doesn't replace a password you don't know, and some app data needs the app's own transfer procedure.
If Samsung Cloud keeps failing, send an error report in Samsung Members with the model, software version, category, and message. For Google backup trouble, give Android Help the selected account and backup status.
Keep the data on your phone until you've confirmed a saved copy of anything missing. If you need a second backup without using the internet, Samsung Smart Switch can save supported data to a computer instead.
The Short Version
Run Samsung Cloud or Google device backup, then back up photos separately and check important files in their cloud destination. Confirm completion and account access before resetting the Galaxy or handing it over.
Checked November 10, 2026.