Microsoft Teams records meetings through More actions > Record on the current desktop interface. Choose what to record and confirm. Your account needs recording access, and participants receive a notice when recording begins.
A missing or locked recording control usually needs an account, meeting-role, or organization-policy change. It isn't fixed by changing the camera or microphone permission on your computer.
In this guide
Check which Teams account and meeting you're using
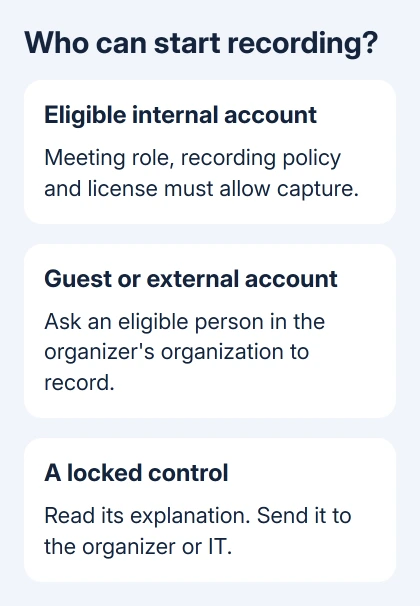
Join using an eligible account from the organization hosting the meeting. Recording access depends on that account and the meeting's settings, rather than simply on who installed Teams on the computer.
Guests, anonymous participants, and external attendees can't start a work meeting's recording. If your account can't record, ask someone from the hosting organization who has recording access to start it.
For the basic call controls, join and control a Teams meeting before opening its recording menu. You'll find recording inside the meeting, after you leave the camera-preview screen and join.
Tell participants what you're recording and follow your organization's rules before starting. The automatic notice tells them recording has begun; it doesn't replace any permission your meeting requires.
Start the recording on a computer
In the meeting, open More actions in the meeting controls and choose Record. Specify the spoken language and what to record, then select Confirm. The current interface can offer Audio only in Choose what to record.
Older Teams layouts show Record and transcribe > Start recording inside More actions. Use that route when those are the labels on your screen. You don't need to leave the meeting to find a different recording application.
Microsoft says the meeting recording controls let eligible participants start and stop recording. Check for the recording notice to confirm it has started.
Only one meeting recording runs at a time. If someone has already started it, ask that person or the organizer about access to the finished recording instead of trying to start a second one.
For an ordinary video recording, Teams captures meeting audio, video, and shared-screen activity. With Audio only, those visuals won't be included. Check your choice before confirming if you need to keep slides or demonstrations.
Record from Teams on iPhone or Android
Join the meeting in the Teams mobile app. Open More options in the meeting controls and select Start recording. Participants receive the same notification when recording begins.
To finish, open More options > Stop recording. Keep the mobile app current if the menu doesn't match, then check the meeting account and permissions rather than switching to the phone's screen recorder.
Both methods use the same meeting recording feature. Starting from a phone doesn't bypass a rule that prevents your account from recording on a computer.
If you change devices partway through, check whether a recording is already active before trying to start it again. The meeting's recording belongs to the meeting, rather than to the particular phone or laptop that started it.
Resolve a locked or missing recording option
On a computer, hover over a lock beside the recording control and read its explanation. A message naming organization policy calls for the IT administrator; one naming the meeting organizer calls for that organizer.
Ask IT to check cloud recording access and the eligible licenses for both the organizer and the person recording. Being able to join a meeting or turn on a camera doesn't mean the account has recording permission.
If the message says only organizers and presenters can record, ask the organizer to review your meeting role. An attendee can't change that role for themselves from the recording menu.
Some organizers with Teams Premium or an eligible Copilot license can limit Who can record and transcribe. Their choices can restrict recording to organizers and co-organizers, include presenters, or prevent recording for that meeting.
I'd send the exact lock message to the organizer rather than asking for a general Teams reset. It identifies whether they should review the meeting options, change your role, or send the request to IT.
After IT changes a policy, give it time to take effect on your account. Repeatedly leaving and rejoining can't override a policy that is still in effect.
Stop capture and find the finished recording
On the current desktop layout, open More actions > Recording and choose Recording to stop the recording and live transcription. Choosing Transcribing alone stops the transcript while recording continues.
Older layouts use Record and transcribe > Stop recording. The meeting can continue after recording stops. Check that the recording indicator has disappeared before beginning a private follow-up discussion.
Teams processes the recording and posts it to the meeting chat, or to the channel for a channel meeting. Open the past event in the Teams calendar to revisit its conversation and saved recording.
For a changed event layout, adjust the replacement Teams calendar before assuming that a missing block means the meeting was deleted.
Ordinary non-channel meeting recordings are generally stored in the organizer's OneDrive. Channel recordings are stored in the team's SharePoint site. Starting the recording doesn't automatically save it to your own OneDrive.
For a copy on your computer, follow the Teams recording download steps. Viewing and downloading have different permissions, so ask the organizer if the video plays but Download isn't offered.
Use the personal-account recording feature when applicable
Teams personal accounts have separate recording eligibility. The personal-use feature is available to Microsoft 365 Personal, Family, or Premium subscribers using a Teams personal account.
In a personal meeting, open More actions > Start recording, choose the spoken language, and confirm. Use More actions > Stop recording when finished. The personal-account guide uses these labels on desktop and mobile.
An organization's meeting policy doesn't become a personal subscription feature just because you also pay for Microsoft 365 at home. Check which account is actually participating before comparing its menus with someone else's.
For a missing recording control, send IT or support the account type, app version, role, and message. If the finished video is missing, ask the organizer to check the meeting chat and the OneDrive or SharePoint location used for it.
The Short Version
Use Record or Start recording with an eligible account and check for the notice. Stop capture through the meeting controls. Find the finished video in the chat or channel. Resolve a locked control through its stated policy or permission.
Checked November 15, 2026.