Word for Mac normally reopens an available AutoRecover copy after a crash. Launch Word again and save any recovered document immediately. If nothing opens, use Finder's Go to Folder to check Word's hidden AutoRecovery folder.
Choosing Don't Save is a different case: Word deletes the recovery copy when you dismiss work that way.
A document saved to OneDrive or SharePoint can have version history. A brand-new document that you never saved there won't have earlier cloud copies to recover.
For a document that was already saved, check its file location and cloud account before treating the whole document as unsaved work.
In this guide
Reopen Word and save the recovered work
Open Word after the crash or unexpected Mac shutdown. Look for a recovered document that opens automatically. Read its last few paragraphs before editing so you know how much work survived.
Save that document straight away with Command+S. If Word asks for a name and destination, give the document a clear name and choose its folder in Finder.
Keep the recovered copy separate from any older saved document until you've compared them.
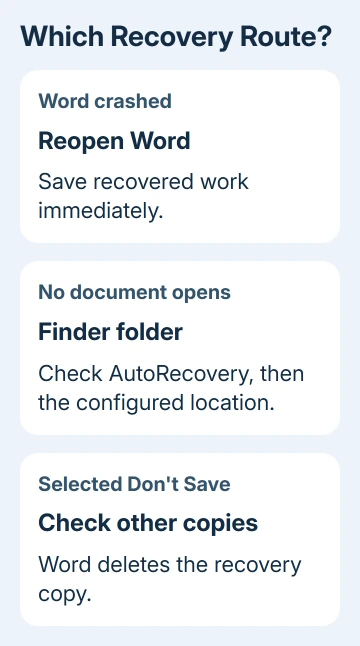
AutoRecover saves a rescue copy at intervals, so it can end before the sentence you were typing when Word stopped. A successful recovery doesn't necessarily contain every last change.
If several documents reopen, inspect each before closing it. A second untitled window can contain work from another session. Give each useful copy a different name rather than overwriting the first recovery you saved.
If saving the rescued text triggers a Word serious disk error, preserve the open window while checking the application and drive.
Our Word for Mac saving guide explains how to choose a local folder or online destination. For now, save the recovered text as a normal document and note which folder you chose.
If Word doesn't offer any work, check the folder next. Repeatedly reopening an empty app won't create a recovery copy that wasn't saved before the crash.
Open the hidden AutoRecovery folder in Finder
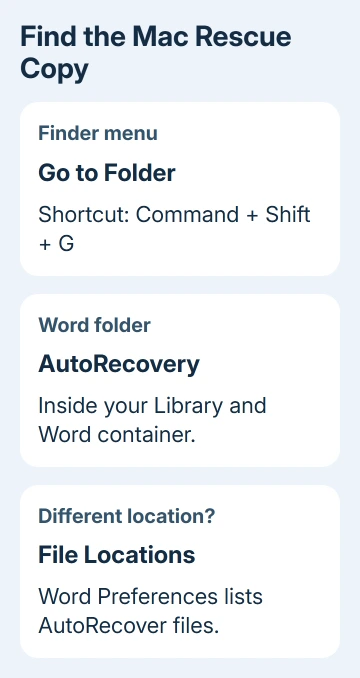
Click Finder in the Dock, then choose Go > Go to Folder from the menu bar. The keyboard shortcut is Command+Shift+G. This opens a box where you can enter the folder's location, even when Library is hidden in Finder.
Paste this path, then press Return:
~/Library/Containers/com.Microsoft.Word/Data/Library/Preferences/AutoRecoveryThe tilde at the beginning means your own home folder. You don't need to replace it with your account name. Keep the rest of the folder names intact, including com.Microsoft.Word.
Microsoft's Mac recovery instructions list this Word location and the Go to Folder method.
Excel and PowerPoint use different locations, so don't substitute a folder intended for another Office app.
If the folder contains files that could be your document, copy them to a separate folder before opening them. Open each in Word, read the text, and save any useful work as a named Word document.
Check what's in the document as well as when it was last changed. A recent file might belong to a different open document, while an older copy can still contain most of the work you need.
Don't delete the recovery-folder contents while you're searching. Even a partial copy is useful when the alternative is rebuilding the document from memory.
Check whether Word uses a different recovery location
A missing or empty default folder doesn't mean another Mac's suggested path is correct for yours. Word lets you change where it keeps AutoRecover files, so check where your copy of Word is saving them.
In Word, open Word > Preferences > File Locations. Under File locations, select AutoRecover files. Use Modify to see the chosen location; cancel afterward if you only wanted to see where Word is saving.
Return to Finder and check that location for your document. Search the folder Word actually uses rather than creating an empty AutoRecovery folder at a location copied from another computer.
This Mac procedure differs from the Windows File > Info > Manage Document route.
Our general Word crash recovery guide covers that Windows workflow; its commands aren't the Mac's Finder path.
If the correct folder is empty, move to an existing saved copy or cloud version. AutoRecover needs a copy from before the failure; changing its settings now only affects future work.
Use version history for a document already saved online
Open the existing document from its OneDrive or SharePoint location in Word. Check that it's the right account and file, especially if a downloaded local copy has the same name.
In current Microsoft 365 for Mac, click the document title and choose Browse Version History. Select a version to open it separately, then compare its text with the current document before choosing Restore.
On older Office for Mac versions, look for File > Browse Version History instead.
The Office version-history instructions separate the current and older Mac routes.
If the current copy contains useful new material too, save a separate copy before restoring an earlier version. Restoring the older version makes it the current file, so compare before choosing it.
Version history helps with changes to an existing cloud document. It doesn't retrieve a local untitled document that never reached OneDrive or SharePoint. Use the recovery folder for that case.
If work vanished during an edit rather than a crash, check the Mac Word Undo fault and preserve surviving text before restoring a version.
I'd compare the actual last page of each possible copy instead of choosing only by time. The version with the latest timestamp isn't useful if it contains the wrong draft or an accidental deletion.
Know when Don't Save has removed the rescue copy
If Word closed normally after you selected Don't Save, its AutoRecover file is deleted. That choice tells Word to discard the session. Reopening the app isn't the same as recovering from a crash.
For a previously saved document, reopen the original and check what it contains. Then check available cloud history or an existing backup. Those copies can still hold useful work, even though they don't undo the Don't Save command.
For a never-saved document with no recovery file, there may be no recoverable copy. Check those locations before paying for recovery software. A tool can't retrieve text that Word never wrote to storage.
If the document matters and the situation is unclear, give Microsoft Support your installed Word version, whether it crashed or was closed normally, and which recovery location you checked.
A work or school IT team can also check managed backups.
Reduce the loss from a future crash
Open Word > Preferences > Save and check Save AutoRecover info. The default recovery interval is 10 minutes; choosing a shorter interval can reduce the amount of work missing from a later rescue copy.
AutoSave is separate. With a supported Microsoft 365 document in OneDrive or SharePoint Online, it saves changes as you work. A local document still needs ordinary saving, even when AutoRecover is enabled.
Name new documents early and use Command+S during work. That gives you a normal saved file to reopen instead of making the first successful save depend on recovery after a crash.
The Short Version
Reopen Word and save any recovered document. If it doesn't appear, check the hidden AutoRecovery folder and Word's configured file location. Use version history for existing cloud files. Don't Save removes the AutoRecover copy.
Checked November 13, 2026.