
A Lenovo desktop needs its monitor, keyboard, mouse and power connected before you start Windows setup. Use one screen at first, connected to the graphics card's video ports if your tower has a separate card.
The connections depend on the model. A Lenovo Tiny desktop uses an external power adapter, while an all-in-one combines the computer and screen. Match the case's model label to the supplied setup sheet before connecting it.
1. Put the computer and its essentials in place
Set the computer on a stable surface with space around its vents. Attach any included stand as shown on the setup sheet. Towers, small desktops and all-in-ones can need different positions to stand safely.
Keep the included power supply with the computer. If you're setting up several PCs together, label each adapter before moving the boxes around. Matching the connector's shape alone isn't enough to choose a replacement supply.
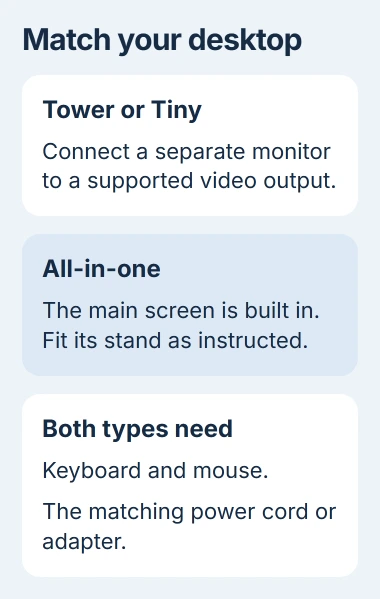
I'd start with the monitor, keyboard and mouse, then add printers and other accessories after Windows works. That makes a missing picture or unresponsive keyboard easier to trace during the first startup.
Check the box for a setup sheet, stand parts and any receiver for the wireless keyboard or mouse. Keep them within reach while you follow the setup sheet.
2. Connect the monitor to the correct video output
Connect your separate monitor to the computer with a compatible video cable. HDMI and DisplayPort are common; older desktops may use VGA or DVI. Check the ports on both devices before buying an adapter.
Lenovo's setup instructions say to use the graphics card's monitor connectors when a separate card is installed. The similar-looking ports elsewhere on the case may be the wrong choice.
Plug the monitor into power as well. A video cable carries the picture; it doesn't replace the screen's power cord. Use the monitor's Input or Source control to choose the connection you used, such as HDMI or DisplayPort.
If the monitor shows No signal, check its cables and selected input first. You need a startup picture before you can work through Windows settings.
An all-in-one has its own screen, so another monitor is optional. If you want a second display, check which port can send video to it on your exact model.
Some USB-C ports can't connect a monitor. For example, the ThinkStation P5 display instructions say its rear USB-C port doesn't support this.
3. Attach the keyboard, mouse and network cable
Plug a USB keyboard and mouse into the computer for setup. If yours came with a wireless receiver, plug that in and follow the keyboard or mouse instructions to switch it on and connect it.
A Bluetooth-only keyboard or mouse may need pairing before it works. If you can't get through setup with it, try a compatible USB one for now. An accessory that hasn't connected can make the PC seem frozen.
For wired internet, connect an Ethernet cable from the router or network outlet to the computer's Ethernet port. That lets you finish setup without Wi-Fi, as long as the wired network has internet access.
For Wi-Fi, have your network name and password ready, and check that your desktop supports it. Two models can look alike while one has Wi-Fi and the other needs Ethernet.
If the computer came with an external Wi-Fi antenna, attach it as the setup sheet shows. The connector and way it attaches vary by model, so match it to your diagram.
4. Connect power and start the computer
If your tower takes a power cord directly, push it firmly into the computer, then plug it into a grounded outlet. On a Tiny PC with an adapter, connect the adapter to the PC and its power cord to the outlet.
An all-in-one can also use an external adapter. Look for its power button on the side or rear edge if it isn't on the front. Find the button in its setup diagram rather than repeatedly pressing the monitor's other controls.
Turn on a separate monitor, then give the computer's power button a normal press. Look for a startup logo followed by Windows setup. If the power light comes on but the screen stays blank, return to the display checks in step 2.
If neither lights nor fans respond, check the outlet and each power connection. For a new machine that still shows no response with its supplied adapter or cord, contact the seller or Lenovo before opening the case.
5. Finish the Windows account and privacy screens
The next screens appear if your desktop came with Windows installed. If it was sold without an operating system, you'll need to install one first; connecting the cables won't bring up Windows setup.
Select the correct region, then choose a keyboard layout matching the keys in front of you. Skip an extra layout if you don't need one. Then connect to your network when setup asks.
Microsoft's Windows setup instructions explain the choices for personal and organization accounts. Pick the one that matches how you'll use your PC.
For your own PC, enter your Microsoft account details or create an account when offered. A work or school PC may need a managed login and extra steps from IT. Confirm that choice before adding your personal account.
Set up a PIN when asked and read each privacy choice before accepting it. Your Windows edition, account and PC model can change which options appear, so work through the ones you see.
Once the desktop appears, use the Windows account controls if another person needs a separate login. Their account can be added after this first setup is complete.
6. Install updates, then check everyday use
In Windows 11, open Settings > Windows Update and select Check for updates. Install the available updates and restart when requested. After the restart, return to Windows Update and check whether anything still needs to finish.
Search Start for Lenovo Vantage, or Lenovo Commercial Vantage if that's the app your PC came with. Check for system updates and review the device information. The options and labels vary by model and app version.
Keep power connected during updates and follow restart prompts. Firmware updates change the PC's built-in software. If Vantage offers one for your model, read its instructions first and let it finish even if the screen changes.
Try typing a short note, moving the pointer, opening a website and playing a little audio. Check each accessory when you add it. If something fails, you can tell support which part isn't working.
For two screens, use the Windows multi-monitor setup after the first display works. It explains how to extend your desktop across both screens and choose the main display.
If you're still stuck, tell support your model, the message on screen and the last step you finished. Explain whether you're missing the startup picture, can't sign in or can't finish an update; each needs different help.
The Short Version
Match the connections to the Lenovo model, start with one working display, and finish Windows setup using the intended account. Then install updates and check each accessory before adding the rest of your desk equipment.
Checked November 4, 2026.

Isaac Smith is the founder and editor of PC Glance, a website that covers computers, laptops, and technology. He is a tech enthusiast and a computer geek who loves to share his insights and help his readers make smart choices when buying tech gadgets or laptops. He is always curious and updated about the latest tech trends.