To change an Epson ink cartridge, first let the printer move its cartridge holder into the replacement position. Leave the printer on, start its ink-replacement command, then release the old cartridge and click in the new one.
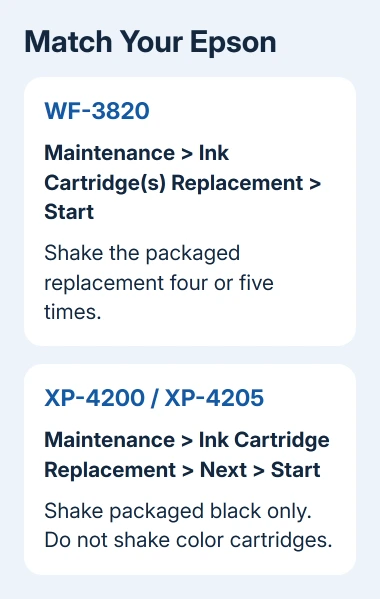
Epson says cartridge preparation depends on your model: shake the packaged replacement for a WF-3820, but shake only black for an XP-4200 or XP-4205. Follow the steps for your printer so the new cartridge is ready to install.
In this guide
Match the printer and replacement before opening anything
Find the printer model on its label, then check the replacement package for that exact model and your region. A similar-looking cartridge isn't enough. Keep the old cartridges installed until the replacements are ready.
These steps are for printers that use cartridges, with separate instructions for WF-3820 and XP-4200/XP-4205. An EcoTank printer with refillable ink tanks needs its model's bottle-refilling procedure instead.
Check which color the printer identifies as empty. Replacing black won't clear a separate cyan-cartridge warning.
If the printer already reports a recognition error, the Epson cartridge detection checks address that fault.
I'd put the replacement packages beside the printer before starting. That lets you complete the change without leaving the holder empty while searching for the right color.
Start the replacement command on your model
For a WF-3820, turn the printer on. If it says a cartridge is expended (empty), note the colors and choose How to.
To replace a cartridge before it's empty, press Home if necessary, then choose Maintenance > Ink Cartridge(s) Replacement > Start.
Raise the scanner unit to its clicked-open position. The cartridge holder moves to the position where the cartridges can be removed. If it returns to the far right, repeat the replacement command and opening sequence.
For an XP-4200 or XP-4205, follow the screen's replacement instructions when the ink runs out. To replace a cartridge early, use Home > Maintenance > Ink Cartridge Replacement > Next > Start.
Raise the scanner unit so its support clicks into place.
The printer moves the holder for you. Don't drag the print head across its rail or use a tool to pry a cartridge free. If it doesn't reach the replacement position, stop and check the displayed instructions rather than pulling harder.
Release the old cartridge at its tab
Squeeze the cartridge's release tab, then lift that cartridge straight up. Replace the color the printer asked for and leave the other cartridges in place unless they also need changing.
Keep the removed cartridge upright and put it somewhere that won't be damaged by ink. Have the new cartridge ready for the next step so the open slot doesn't sit unattended.
An empty cartridge isn't a useful spare for testing. On these models, you can't reinstall and use a low or empty cartridge once you've removed it.
Once you take the empty cartridge out, replace it with the new one instead of trying to use it again.
Prepare the new cartridge using the correct branch
On the WF-3820, gently shake the new cartridge four or five times while it's still packaged, then open the package.
The WF-3820 replacement instructions show the sequence.
On the XP-4200/XP-4205, shake a new black cartridge four or five times before unpacking it. Leave the color cartridges unshaken.
That distinction is in the XP-4200/XP-4205 procedure.
Remove the yellow tape from the replacement. Leave the other seals and labels attached, and avoid touching the green chip or the ink-supply opening. Shaking after opening or removing extra seals can cause a leak.
Check the color label once more before putting it into the holder. Match that label to the empty slot instead of relying on the color of the outer packaging.
Seat it, close the printer, and let charging finish
Insert the replacement into its slot, then push down until the latch clicks. On the XP-4200/XP-4205, the installed cartridge should also sit level with its neighbors. A cartridge resting loosely in the holder isn't fully installed.
For the WF-3820, lower the scanner unit and select Completed if the display asks. The print head returns home and ink charging starts. The model's instructions give about 90 seconds, ending with a confirmation on the display.
For the XP-4200/XP-4205, lift the scanner unit slightly, then lower it. If it catches, raise it once more before closing it completely. Select Completed. Charging takes a few minutes; wait for the completion message.
Leave the power on during ink charging. The replacement is ready when the printer finishes that process, rather than when the lid first closes.
If the WF-3820 reports incorrect installation, reopen it, press the cartridge until it clicks, and confirm OK.
Check the print before changing anything else
On a WF-3820, load plain paper and choose Home > Maintenance > Print Head Nozzle Check > Start. The printed pattern checks whether the printer can put ink on paper without involving a computer application.
If the pattern is complete but your usual print job still fails, check the computer, document, or print settings next. Gaps in the pattern call for the model's print-head cleaning procedure.
Installing a cartridge doesn't tell you whether the nozzles are clear. That's what the printed pattern checks.
Windows 11 can also print a test page: open Settings > Bluetooth & devices > Printers & scanners, select the Epson, then Printer properties > General > Print Test Page.
If paper comes out without the expected ink, use the blank-page printing checks before buying another set.
If the printer won't complete charging, give Epson Support the model, cartridge part number, and exact screen message.
The Short Version
Start the model's cartridge-replacement command, release the old cartridge, prepare the correct replacement, and press it in until it clicks. Keep power on until ink charging finishes.
Use the correct shaking instructions for WF-3820 or XP-4200/XP-4205.
Checked November 11, 2026.