A USB stick that looks smaller or won't format normally after Rufus often still has the layout used for booting. In Rufus, choose Non bootable under Boot selection, then format the correct stick for ordinary file storage.
That fixes a leftover boot layout. A drive reporting No Media, a write-protection message that won't clear, or the wrong physical capacity needs a different check before another formatting attempt.
In this guide
1. Decide whether files need recovering first
Format the stick only when you're ready to erase its contents. Copy any files you still need to another drive before restoring it. If important files are missing, stop here and arrange recovery first.
Restoring normal capacity doesn't bring back files overwritten when the bootable drive was created. Those are separate jobs, even when both problems started with the same Rufus session.
Note the stick's brand and advertised capacity. Disconnect other external storage that you don't need for this work. That makes your USB stick easier to recognize when you're choosing which device to erase.
The size Windows displays can be a little smaller than the number on the package. A large stick showing only a tiny boot partition is a different situation, and that's the layout problem the next step addresses.
2. Select Non bootable instead of another disk image
Open Rufus on Windows and approve its administrator prompt. In Device, select the USB stick by name and capacity. Check that selection again before continuing.
Open Boot selection and choose Non bootable. Don't choose a Windows ISO or another installer image for this job. You're preparing the stick to hold files, not making another installation drive.
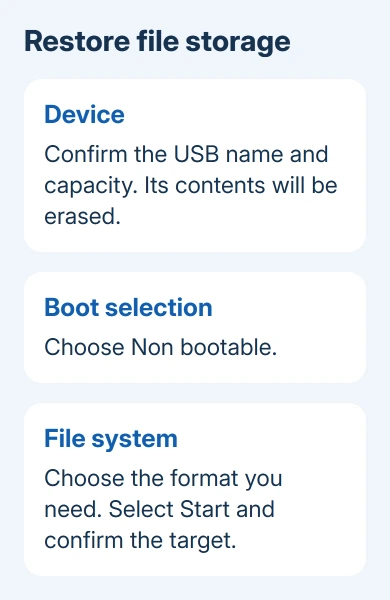
Choose the file system you want for ordinary storage. exFAT is a practical choice for large files moved between Windows and a Mac. NTFS suits Windows-focused use; use FAT32 when a particular device requires it.
Our USB format guide explains that choice in detail, including FAT32's limit on individual file sizes. Leave the allocation-unit setting at its default unless the device you're preparing it for specifies something else.
Select Start, read the erase confirmation, and proceed only when it names the intended device. Wait for Rufus to finish, then inspect the stick in File Explorer.
The Rufus FAQ says this Non bootable route restores media to a Windows-recognizable layout and removes extra partitions it created, including UEFI:NTFS. A stick with a leftover boot layout shouldn't need another boot image to undo it.
I'd try that supported route before a command-line disk reset. It fixes the layout Rufus created and keeps the device name visible while you work.
3. Check Disk Management if File Explorer still looks wrong
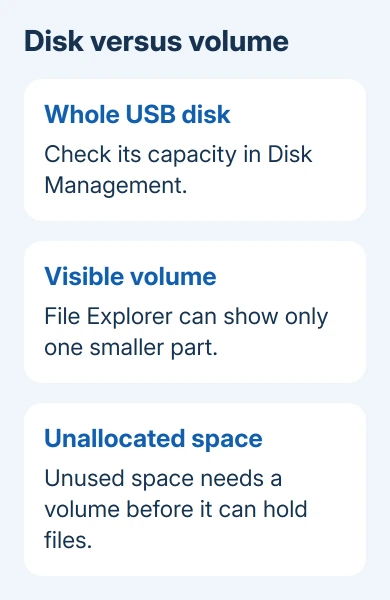
Press Windows + X and choose Disk Management (Windows 10 and 11). Use the lower pane to find the USB by capacity. Check what it shows for the whole disk, not just one volume.
A disk can have several partitions, which divide its space into separate sections. File Explorer shows only the volumes it can open. That's why a small capacity beside a drive letter doesn't always mean the whole stick has lost space.
If the formatted data volume shows as healthy but has no letter, right-click it. Under Change Drive Letter and Paths, select Add and assign an unused letter. Microsoft's drive-letter instructions cover this case.
If your USB stick shows Unallocated space and you don't need its old files, right-click that space and choose New Simple Volume. Use the desired size, assign a letter, and complete the formatting wizard.
A RAW volume has no file system Windows can currently use. Format it only when its contents can be erased. Don't treat a recovery problem as permission to create a fresh file system over the files you need.
Leave the computer's Windows disk, EFI partitions, and recovery partitions alone. If the USB can't be identified with confidence, close Disk Management and compare the disk list with the stick unplugged and plugged back in.
4. Read a failed format before repeating it
If Rufus reports a formatting error, open its Log button and save the text. Note whether the error happens while opening the device, creating its layout, or formatting it.
Close File Explorer windows and apps using the stick, try a direct USB connection instead of a hub, and try formatting it again with the same settings. Check the port and connection before blaming the boot layout again.
If Windows recognizes the volume, try File Explorer > This PC, right-click the USB, and choose Format using the same file system that failed in Rufus. Compare the actual error, not just the fact that both attempts failed.
Rufus relies on Windows formatting services. When Windows itself can't format the device with the same file system, repeatedly changing Rufus versions doesn't address that underlying failure.
Try the stick on another computer if one is available. If it works there, check the first PC's connection, software, or restrictions. The same failure on both PCs points more strongly toward the stick.
5. Stop when the device reports No Media or stays read-only
No Media or a physical disk capacity of zero isn't a normal small boot partition. The USB controller can be detected even when it can no longer access the flash memory.
Check for a physical write-protection switch if the device has one. On a work computer, ask IT whether a removable-drive or encryption policy is blocking writes before trying to remove the write protection yourself.
For an ordinary Windows write-protection message, the write-protected drive guide separates the software flag from other causes. A flash drive can also become permanently read-only when its memory fails.
A stick that reports No Media, or stays read-only on another unrestricted computer, may need replacement. If it contains irreplaceable data, ask a recovery specialist about that exact symptom before further attempts.
Check the restored stick before trusting it
After the format completes, reopen the drive in File Explorer and inspect Properties. Copy a file you don't need onto it, open that copy, then eject and reconnect the stick and open that file once more.
When the stick is needed for setup again, create a fresh Windows 11 Rufus installer instead of copying an ISO onto ordinary storage.
If errors return or files disappear, don't use the stick as the only copy of anything. Send the manufacturer its model, reported physical capacity, Rufus log, and the result from the second computer when asking about warranty replacement.
The Short Version
Use Rufus's Non bootable option to undo its boot layout. Check Disk Management for a missing letter or unused space if necessary. No Media and persistent read-only failures need hardware or policy checks rather than another boot image.
Checked November 12, 2026.