Virtualization on an ASUS Windows 10 PC is enabled in BIOS, the setup screen that runs before Windows. Turn on Intel Virtualization Technology or Intel VMX for an Intel processor, or SVM Mode for AMD, save the change, and restart.
Check Task Manager first. If it already says Virtualization: Enabled, the BIOS setting is already on, so check why your app still won't work.
In this guide
Check the processor and the current setting
Press Ctrl+Shift+Esc to open Task Manager. Select More details if it opens as a small app list, then choose Performance > CPU. The processor name tells you whether to follow the Intel or AMD instructions.
Read Virtualization in the CPU details. Disabled means the firmware option needs checking. Enabled means you can skip changing that setting and check what your virtual-machine app requires in Windows.

Virtualization lets an app run a separate operating system or similar environment using your processor's hardware support. Turning it on in BIOS lets Windows use that hardware support. You'll still need the right software in Windows.
For the model name, press Windows+R, enter msinfo32, and press Enter. Note System Model. On a custom desktop, also note BaseBoard Product, which identifies the ASUS motherboard rather than the case.
Keep the model name handy if the menus don't match. A notebook, a desktop motherboard, and another maker's PC with an ASUS graphics card don't all use the same BIOS instructions.
Open BIOS from Windows 10 or the startup key
Save your open work. In Windows 10, open Settings > Update & Security > Recovery. Under Advanced startup, select Restart now.
Choose Troubleshoot > Advanced options > UEFI Firmware Settings > Restart. The computer restarts into its BIOS setup screen. Microsoft's virtualization guide describes this route and links the manufacturer instructions.
For comparison, Windows 11 puts the starting page at Settings > System > Recovery. That difference doesn't change the Intel or AMD switch inside the ASUS firmware.
Without UEFI Firmware Settings, use the startup key. ASUS desktop boards use Delete during startup. On ASUS notebooks, hold F2 while pressing Power, following the model's BIOS-entry instructions.
If the Windows sign-in screen appears, you've missed the chance to open BIOS with the startup key. Restart and try again rather than tapping keys after Windows is already running. The BIOS entry guide explains the recovery route too.
Change only the virtualization option needed for this task. Storage mode, Secure Boot, boot order, and security options aren't substitute switches and can affect whether your existing Windows installation starts.
Enable the Intel option on an ASUS motherboard
On an ASUS Intel desktop board, press F7 if setup opens in EZ Mode. This opens Advanced Mode. If it already shows Advanced Mode, stay there.
Open Advanced > CPU Configuration. Select Intel(VMX) Virtualization Technology and change it to Enabled. This is the setting named in the ASUS motherboard procedure.
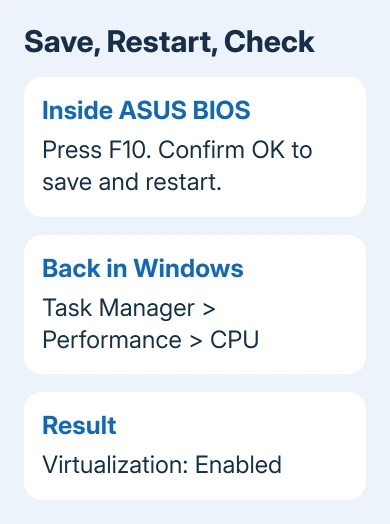
Press F10, review the changes you're saving, and confirm OK to restart. Let Windows load normally, then return to Task Manager's CPU page to check the result.
Notebook firmware may call the option Intel Virtualization Technology instead. Use the notebook's own menu layout when it differs from the desktop procedure. Look for the full setting name; the screen layout can differ between models.
If Intel Virtualization Technology is grayed out on your notebook, the notebook instructions say to disable Intel Trusted Execution Technology first. Apply this only when both settings match your notebook.
On a work computer, ask IT to handle a locked or controlled firmware setting. An administrator password prompt in BIOS isn't something a Windows command can remove.
Turn on SVM Mode for an AMD ASUS motherboard
On the AMD motherboard interface, enter Advanced Mode and open Advanced > CPU Configuration. Set SVM Mode to Enabled. SVM is AMD's hardware virtualization setting.
Press F10 and confirm OK to save and restart. Back in Windows, check Task Manager > Performance > CPU. Virtualization: Enabled confirms that Windows can see the firmware setting.
An AMD notebook may arrange its firmware menus differently. If CPU Configuration or SVM Mode isn't present, consult the documentation for your recorded model. Don't choose an unrelated security setting because it has a similar abbreviation.
With no SVM switch visible, ask ASUS support whether your model and processor support enabling it. Support needs to know that the setting is missing, rather than just turned off.
Check the result before adding Windows features
I'd restart and check Task Manager before installing anything else. If virtualization still reads Disabled, re-enter BIOS and confirm the setting stayed Enabled after saving. Leaving setup without saving won't apply the change.
When Task Manager reads Enabled but an emulator or virtual machine still refuses to start, record its exact error. With the BIOS setting on, the next step is to check what your app needs in Windows.
Some tasks need Virtual Machine Platform. To enable it when your chosen software requires it, search Start for Windows features. Open the matching Control Panel result, select Virtual Machine Platform, click OK, and restart if requested.
That checkbox controls a Windows feature, while VMX and SVM control hardware support in BIOS. Enabling it won't turn a Disabled firmware setting into Enabled. Likewise, switching on VMX or SVM doesn't install a virtual-machine app for you.
Follow your app's instructions for Hyper-V or other Windows components. Don't turn every virtualization feature on together just to silence an error, since the right combination depends on the software you're running.
With the firmware setting enabled, the Windows 11 Hyper-V installation adds the platform and management tools through Windows Features.
A BIOS update also isn't a routine part of enabling this option. If support traces the problem to your BIOS version, use the ASUS BIOS update methods for that exact model and version.
For a persistent failure, send ASUS the model, BIOS version, processor, and Task Manager result. Send the app maker the same details plus its exact error message. These details help distinguish missing hardware support from an app problem.
The Short Version
Check Task Manager first. If virtualization is Disabled, enable Intel VMX or AMD SVM in the ASUS firmware, save with F10, and restart. Add Windows virtualization features only when your chosen app requires them.
Checked November 12, 2026.