

An ASUSTeK COMPUTER INC. - Firmware entry in Windows Update can be an ASUS firmware update, rather than an ordinary app update. Check your exact computer model and current BIOS version, then use an update method your model supports.
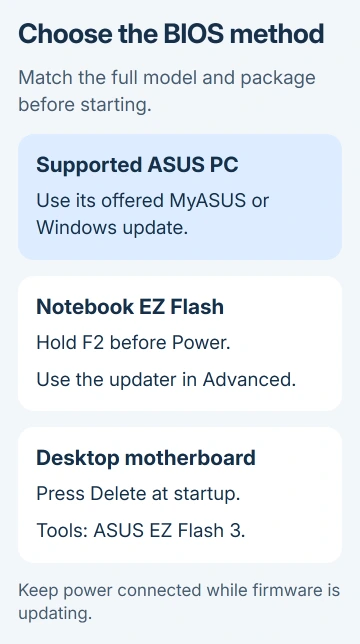
Notebooks, desktop motherboards and failed updates need different steps. Supported PCs can use MyASUS or a Windows installer; EZ Flash runs inside setup.
Don't select a motherboard file because its name resembles your laptop's. Match the full model before downloading firmware.
Check the model, version and reason for updating
Press Windows + R, type msinfo32 and press Enter. Write down System Model and BIOS Version/Date. For a custom desktop, also note BaseBoard Manufacturer and BaseBoard Product so you can identify its motherboard.
The BIOS is the firmware that starts hardware before Windows loads. Its date alone doesn't tell you whether an update is needed. Read the release notes for the version offered to your exact model.
For a stopped pointer, check the ASUS touchpad controls before choosing firmware as the repair.
I'd start with the BIOS update decision guide if the computer works normally and the only concern is an old date. A fix for your problem or a relevant security update gives the job a clear purpose.
Make a backup of important files and retrieve the BitLocker recovery key before you start. Firmware changes may trigger a recovery prompt; Microsoft's recovery-key instructions explain where to find that key.
Keep a laptop connected to its AC adapter. For notebook EZ Flash updates, the battery must also be at 20% or higher. Leave the power connected throughout flashing.
Use the update offered to your supported ASUS computer
Open MyASUS from Windows search and look for System Update. On supported devices, it checks for updates intended for that computer. Select the BIOS package after reading its details, then choose Update selected items and follow its prompts.
If System Update is missing, that feature isn't supported on the device. Move to the model's official support downloads rather than trying to make another ASUS computer's update appear in MyASUS.
For Windows Update, open Settings > Windows Update on Windows 11. On Windows 10, use Settings > Update & Security > Windows Update. When a firmware update requests a restart, allow enough time to keep the computer powered until it finishes.
ASUS's firmware troubleshooting page confirms that Windows Update can retrieve ASUSTeK COMPUTER INC. - Firmware. That name alone isn't a reason to remove it from Device Manager.
A successful restart should return you to Windows. Reopen System Information and compare the BIOS version with the package you installed. Downloading the file doesn't install it; the version check tells you whether the update finished.
Download files only for the exact model
Open the ASUS Download Center and find the full model. On its support page, open the BIOS downloads. Desktop motherboard pages group these under Driver & Utility > BIOS & FIRMWARE.
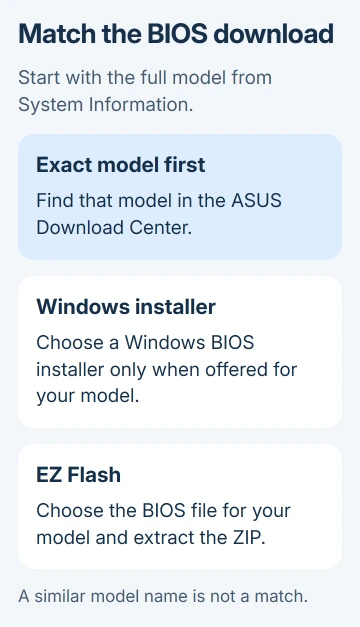
A Windows BIOS installer and an EZ Flash file are different packages. Use BIOS Update for Windows or BIOS Installer for Windows only when your model offers that route, then follow its supplied instructions.
For an update from inside BIOS setup, look for BIOS for ASUS EZ Flash Utility or the BIOS file specified by the model's instructions. Download the ZIP, choose Extract All, and use the extracted BIOS file rather than the unopened archive.
Stop if the model doesn't match, the package is rejected or the required update method isn't offered. Ask ASUS support to identify the correct file using your full model and current version. Renaming a wrong file won't make it compatible.
Follow the notebook's own EZ Flash interface
Copy the extracted file to a FAT32 USB drive. Use an already suitable drive, or copy its contents elsewhere before formatting because formatting erases them.
With the notebook shut down, hold F2, press Power and keep F2 held until BIOS setup opens. The updater's name and menu depend on which BIOS setup screen your notebook has.
For the UEFI interface, press F7 for Advanced Mode. Open Advanced, then ASUS Firmware Update. Some models call this ASUS EZ Flash 3 Utility. Select the USB device and extracted BIOS file.
Confirm the displayed file information before accepting the update prompts. The model and version should match the intended package. Once the BIOS update starts, let the notebook finish and restart by itself. Don't force it off.
For the Legacy interface, use the keyboard to open Advanced > ASUS EZ Flash 3 Utility. Select the storage device, choose the BIOS file and confirm with Yes when the details are correct.
For MyASUS in UEFI, press F7 for Advanced Settings, then open Advanced > ASUS Firmware Update. Select the device and file, check the information and use the Confirm prompts.
Follow the steps for the setup screen your notebook actually shows. The notebook EZ Flash instructions include the screen variations and automatic restart behavior.
Use the motherboard procedure for a custom desktop
Check that the motherboard supports ASUS EZ Flash 3. Its procedure uses a USB drive in FAT16 or FAT32, with the extracted .CAP file in the drive's root, rather than inside the ZIP.
Press Delete at the ASUS logo to enter setup, then F7 for Advanced Mode. Open Tools and select ASUS EZ Flash 3 Utility. Choose the USB drive, then the BIOS file.
Accept the file selection, check the BIOS information and confirm the update. When the update finishes and the updater offers OK, select it to restart. Keep the computer powered during the entire operation.
USB BIOS FlashBack is a separate feature available on selected boards. Its special USB port and file-renaming procedure aren't instructions for every EZ Flash update. Follow the motherboard manual if recovery or FlashBack is what you need.
Match a failed update to its actual error
If Windows opens but firmware has a yellow warning, open Device Manager, expand Firmware, and read the affected device's Properties > General message. The error code decides the next action.
For Code 14, the supported procedure is Restart Computer, select the restart-on-Finish option and choose Finish. The restart can begin the pending BIOS update, so keep power connected.
For Code 10, the firmware-specific procedure is Uninstall device, select Attempt to remove the driver for this device, confirm, then use Scan for hardware changes. Once the device displays normally, install the correct BIOS update.
For a warning specifically on ASUS Component Firmware Update, uninstall that entry with the driver-removal option, restart, then run Windows Update. These steps apply to that warning, not to a firmware device that's working normally.
If the update fails because of encryption, follow the encryption steps on the linked ASUS troubleshooting page. Ask IT to handle those changes on a managed computer. Don't keep retrying a failed flash without reading its actual error.
If an interrupted BIOS update leaves the computer unable to load Windows, you can't use these Windows-based steps. Give ASUS service the model, BIOS file used and interruption details, and ask for the model's BIOS recovery procedure.
For basic access help, use the firmware entry guide.
The Short Version
Choose a BIOS package by its complete ASUS model name and version. Use the supported MyASUS, Windows or EZ Flash route, and keep power connected. A failed firmware entry needs its exact Code 10, Code 14 or component-update procedure.
Checked November 8, 2026.

Isaac Smith is the founder and editor of PC Glance, a website that covers computers, laptops, and technology. He is a tech enthusiast and a computer geek who loves to share his insights and help his readers make smart choices when buying tech gadgets or laptops. He is always curious and updated about the latest tech trends.