Chrome cleanup can mean clearing cached files, removing unwanted extensions, or stopping a site from sending notifications.
Start with the part causing trouble: clearing everything can mean logging back into websites, while deleting browsing data won't remove an unwanted extension.
A page that looks broken needs a different cleanup from a browser whose search engine keeps changing. Use the matching section, then reopen the affected page before making a bigger change.
In this guide
Clear cached files for broken or outdated pages
On Windows, Mac, or Chromebook, open Chrome's three-dot menu and select Delete browsing data. Choose a time range. All time includes older stored files that a short time range would leave behind.
Select Cached images and files. Leave unrelated categories unchecked for a cache-only cleanup, then select Delete data. Reload the troublesome page afterward and check its layout or content.
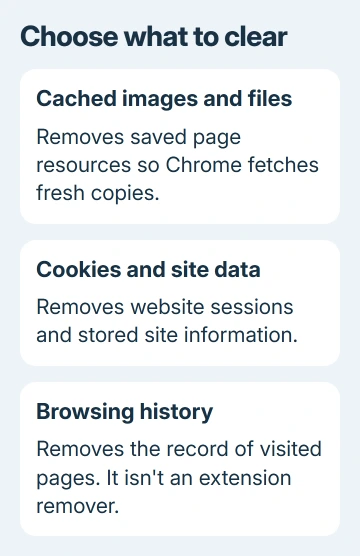
Cached files are saved parts of websites, such as images and other page files. Removing them makes Chrome fetch fresh copies. That first visit can be slower while Chrome downloads those files again.
Cookies and other site data do different jobs, such as keeping you signed in and remembering your preferences. Clear them when you want to remove that site's saved information, rather than selecting them for every display problem.
Google's browsing-data guide separates these categories and explains what each removes.
Data saved to your Google Account can also be removed from other devices when you delete it while signed in.
For a Chromebook, the cache cleanup steps also explain the difference between browser data and the computer's wider storage use.
A small cache doesn't account for large video files elsewhere on the device.
Use the phone's own browsing-data controls
In Chrome on Android, tap the three-dot menu and choose Delete browsing data. Check the time range and use More options to review the categories before confirming the deletion.
For a cache cleanup, choose Cached images and files and leave cookies and history unchecked to keep that data. Review the final selection rather than assuming the quick-delete screen is set to cache only.
On iPhone or iPad, open Chrome's three-dot menu and choose Delete Browsing Data. Set Time Range, open Browsing Data, and select the categories you want cleared. Confirm the selection, then complete Delete Browsing Data.
These are Chrome's own controls. Clearing Safari data in the iPhone's Settings app doesn't perform the same cleanup inside Chrome. Reopen the affected site in the browser you just cleaned to check the result.
If the page still fails on the phone, try another ordinary website before deleting more data. A failure across sites can be a connection problem, while one broken page can need help from the people who run that site.
Remove extensions you no longer use
On desktop Chrome, open three-dot menu > Extensions > Manage extensions. Read each extension's name and purpose. Turn an extension off to check whether it's causing the unwanted behavior, or select Remove for an extension you no longer use.
Confirm Remove when prompted. Revisit the page or open a new tab to check whether the toolbar, redirect, or added page feature has gone. Hiding an extension's toolbar icon doesn't uninstall it.
If you disable several extensions to check a fault, enable the ones you trust one at a time. Recheck that page between changes to spot the extension that causes the trouble.
I'd use Chrome's built-in deletion dialog for occasional cleanup. Adding another extension just to remove cached files gives you another piece of browser software to manage.
For a tool you've already chosen, the Clear Cache extension settings explain why its selected data types matter. Check what its toolbar button deletes rather than assuming it only clears cached files.
An extension labeled as controlled by your organization needs the administrator's help. Give IT its name and the behavior it adds, so IT can review the installation policy.
Stop website notifications separately
Messages that appear even when you're not reading the website can be notifications from a permission you granted earlier. On desktop Chrome, open Settings > Privacy and security > Site settings > Notifications.
Review the sites allowed to send notifications. For an unwanted site, open its menu and choose Block. Check the actual site address, especially when the notification claims to be an antivirus warning or an account alert.
On Android, open Chrome > three-dot menu > Settings > Site settings > Notifications and review the site's permission. Blocking a website notification is different from disabling every notification from Chrome in Android settings.
Don't click a notification's download or cleanup button to remove it. Change its permission in browser settings. A message inside a webpage can't replace a scan by your computer's security software.
Once the notification stops, leave the browser reset alone unless another problem remains. Continue with the next section when redirects, changed search settings, or unwanted software remain.
Remove unwanted programs before resetting Chrome
On Windows 11, open Settings > Apps > Installed apps. On Windows 10, use Settings > Apps > Apps & features. Review a program you recognize as unwanted, select it, and choose Uninstall.
On Mac, open Finder > Applications and remove the unwanted program using its uninstall instructions or Move to Trash when appropriate. Check the program's identity before removing software you simply don't recognize.
Google's unwanted-software procedure puts the computer check before the browser reset. If a program keeps changing Chrome, the problem can return after a reset.
For the desktop browser reset, open Settings > Reset settings, select Restore settings to their original defaults, then confirm Reset settings.
This changes startup, search, site permissions, cookies, extensions, and themes; it keeps saved bookmarks and passwords.
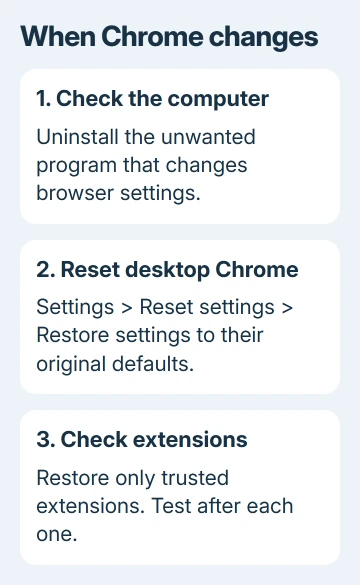
Reopen Chrome and check the search engine, startup page, and the original unwanted behavior. Turn trusted extensions back on individually. Don't restore every extension at once if you're checking which one caused the change.
If redirects return on Windows, open Windows Security > Virus & threat protection and choose Quick scan. Read the result and follow the security app's recommended action for any detected threat.
For a Mac with recurring changes, use the support channel for your installed security software or Apple Support. Give them the unwanted address and program or extension names, rather than installing a cleaner advertised by the pop-up.
On a managed computer, send those details to IT to check installed software and browser policy. If the computer check is clear but Chrome still changes, use Chrome menu > Help > Report an issue and describe how the settings return.
The Short Version
Clear cache for stale page files, remove unwanted desktop extensions, and block notification permissions at their source. Check installed programs before a desktop reset when Chrome keeps changing itself.
Choose data categories carefully instead of deleting everything.
Checked November 11, 2026.