iMessage starts working on a Mac when the Messages app is signed into your Apple Account. Open Messages, enter the account you use on your other Apple devices, then select the receiving addresses you want to use.
Blue iMessages can work without an iPhone. Green SMS, MMS and RCS texts need an iPhone connection and the appropriate forwarding setup, so a Mac that sends blue messages but lacks green ones needs a different setting.
In this guide
Start with the Messages app sign-in
Open Messages from the Applications folder or find it with Spotlight. When the sign-in screen appears, enter the email or phone number used for your Apple Account, choose Sign In, then enter the password and finish the prompts.
Use the same account on your Apple devices so messages use the same contact details. A different account can sign in successfully while leaving you with different addresses and missing conversations.
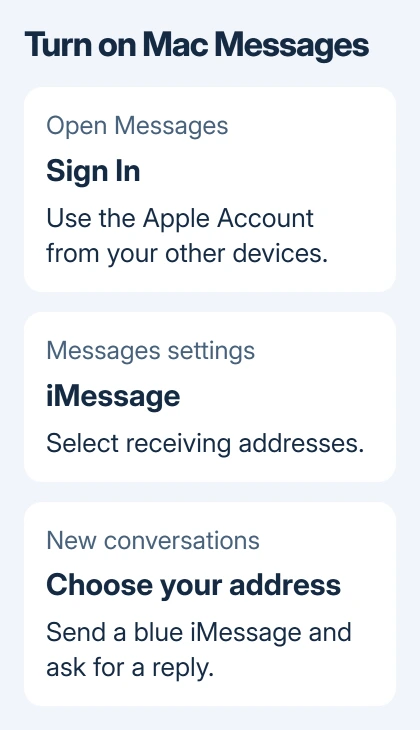
When the app opens directly to conversations, check the account instead of signing out immediately. Choose Messages > Settings > iMessage. The account shown there tells you which login Messages is using.
On macOS Monterey and earlier, the menu is Messages > Preferences. On newer macOS versions, it's Messages > Settings. The setup works on an Intel Mac as well as a Mac with Apple silicon.
The app should let you create a message once sign-in finishes. Apple describes iMessage and carrier-text setup separately in its Messages instructions.
Choose the address people should use
In Messages > Settings > iMessage, look for You can be reached for messages at. Select the email addresses or phone number you want to receive messages through.
Then check Start new conversations from. Choose the address or number you want people to see on a new conversation. This matters when contacts already know your phone number and don't recognize an email address.
A Mac doesn't create a new mobile number for iMessage. To use your iPhone number, first activate it in iPhone Messages with the matching Apple Account.
On a current iPhone, open Settings > Apps > Messages > Send & Receive and check the account and selected number. In iOS 17 and earlier, open Messages directly from the main Settings page.
After the number becomes available on the Mac, select it in the receiving list and choose it for new conversations if that's your preference. An existing conversation can keep using the address it started with.
I'd settle the sending address before telling contacts the Mac is ready. That avoids a first test arriving from an unfamiliar email and looking like a separate person.
Send one new iMessage to check delivery
Choose the compose button in Messages and enter an address or phone number for someone who uses iMessage. Type a short message and send it. A blue message bubble identifies the iMessage route.
Ask the recipient to reply to that new message. That checks whether replies reach the address you selected. An older chat might have started with a different address.
A green message goes through a mobile carrier. It doesn't mean that iMessage is disabled for every contact. How it sends depends on the other person's messaging service and the address or number you chose.
If only one recipient won't work, check their address before changing the whole Mac setup. Someone's old email address can remain in Contacts even after they've stopped using it for iMessage.
Read receipts are optional. Send read receipts controls whether people can see that you've read their messages; it doesn't enable message delivery.
Add green texts from an iPhone
- On the iPhone, open Settings > Apps > Messages and turn on iMessage.
- Open Send & Receive and compare the Apple Account with the Mac Messages account.
- Return to Messages settings on the iPhone and open Text Message Forwarding.
- Turn on the Mac in the device list and complete any code prompt shown during setup.
Leave your iPhone powered on with an internet connection. The Mac uses the iPhone for SMS, MMS and RCS forwarding, with availability depending on the carrier and region.
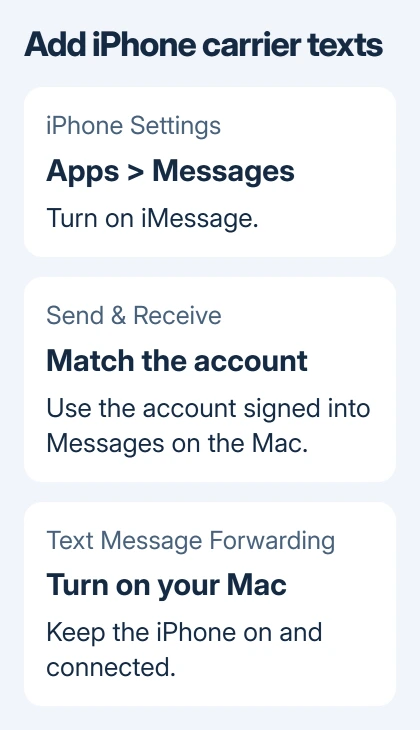
If Text Message Forwarding isn't visible, compare the accounts on your iPhone and Mac. If your Mac is missing from the list, check its account and connection; notification sounds won't change that list.
Skip this step if you only need iMessage with other Apple users. A Mac can send blue iMessages using an account email address without an iPhone number being available.
Bring older conversations across separately
New messages can arrive before your older conversations have downloaded. In the Mac's iMessage settings, Enable Messages in iCloud stores and updates the shared history through iCloud.
The feature requires two-factor authentication and iCloud Keychain. It also includes carrier-text forwarding, so devices already using Messages in iCloud don't need a separate Text Message Forwarding setup.
Once enabled, Sync Now asks the Mac to update its messages. The first transfer can take time, especially when conversations contain attachments. Missing history immediately after sign-in doesn't mean the new-message test failed.
Use the Messages in iCloud syncing checks when new messages arrive but older conversations don't. Those checks address missing history; an account that can't send messages needs different checks.
Turning off notifications also differs from turning off iMessage. A quiet Mac can still receive messages in the app. Check the conversation list before treating silence as a delivery failure.
Handle a sign-in or activation error
Check that the Mac can reach the internet, that its date and time are correct, and that macOS is updated. Try signing into Messages again after those checks; repeated password changes won't help a connection problem.
For a persistent unknown error, follow the Mac iMessage sign-in error steps. Write down the warning and check whether another Apple service accepts that account.
If the account works elsewhere but Messages still refuses it, ask Apple Support to check iMessage activation for the affected Mac. Include the macOS version along with the activation warning's exact text.
Don't erase your Mac just because Messages won't sign in. Give support the account, receiving addresses and forwarding settings first; the login problem can remain after reinstalling.
The Short Version
Sign into Messages, select receiving addresses in Messages > Settings > iMessage, and choose the address for new conversations. Test a blue message. Use Messages in iCloud for history and forwarding, or set up forwarding separately.
Checked November 15, 2026.