Try left Alt + Enter while editing the cell's text. Owners confirmed it worked when right Alt didn't. If the break is present but its second line stays hidden, turn on Wrap Text and adjust the row height.
A ribbon tab or Save As window opening is a different symptom from hidden text. Check that Excel is editing the cell before pressing the shortcut. The Windows steps apply to the original Excel 2010 reports and current desktop Excel.
In this guide
1. Use the left Alt key while editing the text
Double-click the cell so the text cursor appears inside it. Click exactly where the next line should begin. Hold the left Alt key, press Enter once, then release Alt and continue typing.
Press Enter without Alt when you're ready to finish editing. The text should remain in the same cell, with a line break where you inserted it. Selecting the cell afterward should show the complete content in the formula bar.
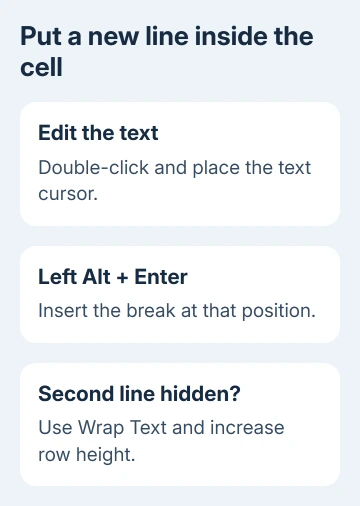
The line-break instructions require the insertion point to be inside the cell's text. Selecting the cell once is different: Excel is ready for commands rather than editing at a chosen character.
One owner switched to left Alt successfully, and two replies confirmed the same result. Keyboard layouts can give the right Alt key a different role, often labeled AltGr, so try the left key even if both keys look interchangeable.
If the new line works, finish editing, then look for the new line in the row. If a menu or ribbon tab opens instead, move to the edit-mode check. If typing continues on a hidden second line, skip to Wrap Text.
2. Stop the shortcut from acting on the ribbon
Press Esc to leave an open menu. Return to the worksheet, double-click the cell, and look for the blinking insertion point. Then use left Alt + Enter with Alt held down while Enter is pressed.
In desktop Excel for Windows, you can also select the cell and press F2 to edit. The formula bar is also usable: click within its text at the required break, rather than just selecting the cell in the grid.
The original report described a line break sometimes working, Save As sometimes opening, and the Data ribbon sometimes becoming active. Note which happens; a command opening is different from hidden text.
If Excel shows ribbon key letters when Alt is pressed, check the insertion point again. Don't keep pressing shortcuts into a menu, because the following keys can run commands unrelated to the text you intended to edit.
Try a blank cell in a new workbook with a short phrase such as First line Second line. Put the cursor between the words where the break belongs. If it works there, check the original cell or workbook setup next.
If left Alt still behaves incorrectly in that simple test, compare another keyboard when one is available. If another keyboard works, tell IT. You haven't had to change the workbook to check that.
A separate Alt+F11 failure in Excel can come from laptop Fn behavior or an NVIDIA shortcut conflict.
3. Turn on Wrap Text when the line is hidden
Finish editing, select the cell and choose Home > Alignment > Wrap Text. This controls how the cell displays multiple lines. A break at a chosen word still needs to be inserted while editing.
One owner confirmed that turning text wrapping on made the existing line breaks work. That fits a display problem: the content can contain line breaks even though the worksheet isn't showing them as expected.
Look at the selected cell's contents in the formula bar and compare them with the grid. If the text continues where you expect the next line, but the visible cell is too shallow, adjust its row next.
I'd check the display before inserting the break repeatedly. Otherwise, several invisible breaks can leave a large gap once the row is finally tall enough to show the content.
Automatic wrapping also responds to column width. A narrow column can create several visual lines without any manual breaks. The shortcut puts a break exactly where you want it; Wrap Text fits the text to the cell's width.
For automatic line placement as the column narrows, use Excel's Wrap Text setting. A manual break controls one position; wrapping also fits the rest of your text to the column.
4. Increase row height, especially with merged cells
For an ordinary unmerged cell, select its row and choose Home > Format > AutoFit Row Height. The row should expand to fit the wrapped text rather than retaining a fixed height that clips later lines.
For a manual adjustment, drag the boundary under the row number downward. Stop when all intended text is visible. The new height applies across the row, so check your neighboring cells too.
The original question used merged cells for paragraphs. Merged ranges can prevent all wrapped text from being visible, so set the row height manually if automatic fitting doesn't provide enough space.
The wrapping and row-height guidance identifies fixed row height and merged cells as reasons wrapped text can remain hidden. Try a taller row before unmerging an entire report.
If the workbook also has missing navigation controls, restore the Excel scroll bars separately. Those window controls don't insert breaks or change the height of the text area.
5. Use the Mac shortcut or report the remaining fault
On Excel for Mac, use Control + Option + Return while editing the text. The Mac shortcut differs from the Windows one, but it puts another line inside the same cell.
If the shortcut and row adjustments fail, record your Excel version, operating system, keyboard layout and whether the cell is merged. Say what happens: a menu opens, editing finishes, or the second line stays hidden.
Give IT a short sample and those details. Personal users can send the sample to Microsoft Support. For an old Excel 2010 installation, compare a copy in supported Excel rather than expecting a new 2010 patch.
The Short Version
Edit the cell and use left Alt + Enter on Windows. Turn on Wrap Text for hidden lines, then increase row height, using a manual height for merged cells when needed. On a Mac, use Control + Option + Return.
Checked November 16, 2026.
 If you have any business, I can build it online