Excel's Cannot shift objects off sheet error can come from hidden pictures, shapes, or old cell comments, even when the worksheet looks empty. Start by showing all objects, then retry the row or column change that failed.
The message is about items attached to the sheet, so deleting hundreds of blank rows may change nothing. If showing objects doesn't help, check how the affected objects move with their cells.
In this guide
1. Show all objects before changing the sheet
In desktop Excel for Windows, press Ctrl + 6 once to toggle object visibility. Check whether pictures or other inserted items appear, then repeat the hide or insert action that produced the error.
If you can't tell which state the shortcut selected, use the setting itself. Open File > Options > Advanced, then find Display options for this workbook. Check that the intended workbook is selected there.
Under For objects, show, select All and click OK. Choosing All directly removes any doubt about whether the shortcut hid or showed the objects.
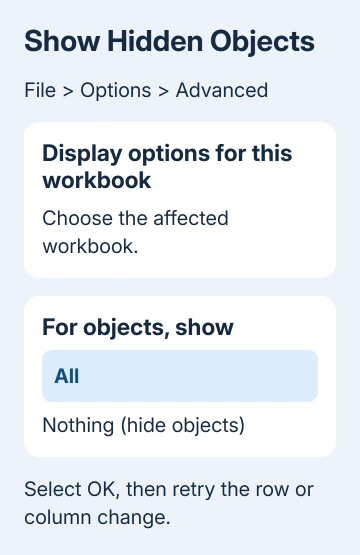
In Excel 2007, the entry point is the round Microsoft Office button > Excel Options > Advanced. In Excel 2003, use Tools > Options > View and select the all-objects display option.
Those older paths matter when the workbook is being edited on an old office computer. The current File > Options route belongs to Windows desktop Excel, rather than Excel for the web or the Mac preferences window.
Try the same columns or rows again. If the operation now works, save the workbook and inspect the nearby charts and shapes. The display setting fixed the error, and you haven't had to remove those items from the file.
If All is already selected and the error continues, keep that setting and check the objects. Now that you can see them, it's easier to decide which object's settings need changing.
2. Inspect notes as well as visible pictures
Save a separate working copy through File > Save As before altering object properties. A workbook can contain a useful button, chart, or note outside the main table, even when those cells contain no values.
Start around the columns you're hiding or the place where you're inserting rows. Then check farther to the right of the data. An object can overlap a column even though its associated cell is elsewhere.
Check old-style cell comments too. Their text boxes are normally hidden. Current Excel calls these Notes, while old Excel versions call them Comments. Threaded comments have different controls.
In current Windows Excel, open Review > Notes > Show All Notes. In an older version, use its Show/Hide Comments command. Look at the note boxes near the affected area, rather than just the cell text.
For pictures and shapes, Home > Find & Select > Selection Pane gives you a list of objects. Select an item in the list and check which part of the worksheet it highlights before making a change.
An empty-looking range isn't necessarily free of objects. One owner in the original 2010 question reported that deleting blank rows hadn't helped, so check the attached objects as well as the cell contents.
If nothing is visible in the area, check whether another part of the sheet contains the object being pushed. Keep the saved copy as your test file while you work through the remaining items.
3. Let the affected object move with its cells
For an old-style comment, show it first, then select the whole box by clicking its edge. Clicking inside the text puts you in editing mode, which gives you different controls.
In older Excel, right-click the selected edge, choose Format Comment, and open Properties. Select Move and size with cells, then confirm the dialog. Repeat the failed row or column operation in the test copy.
For a picture or shape in current desktop Excel, right-click it and open Format Picture or Format Shape. In Size & Properties, expand Properties and look for the same movement choice.
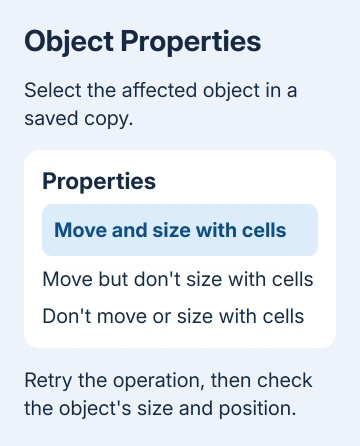
This changes how that item follows row and column sizes. Check its appearance after the operation, because a picture or text box can shrink as its cells shrink. Keep a copy where the original layout remains available.
Microsoft's object-error repair covers both settings for older releases.
Apply the change to the affected item first. I'd avoid a macro that changes every shape at once; a sheet's controls and charts can need different positioning behavior, and a single-object change is easier to assess.
If the operation succeeds, inspect the working copy before replacing the original. Check that the note remains readable and any nearby pictures, controls, or charts still sit with the intended records.
4. Separate this error from other worksheet failures
The message Fixed Objects Will Move is a different warning.
Use the fixed-object warning checks for that wording rather than assuming every mention of objects needs the same checkbox.
If the intended task is moving records, review the Excel row-moving procedure after clearing the error.
When you move cells, check what happens to their attached objects too.
Compare the same simple hide or insert action in a new workbook. If it works there, give the affected copy to its author or IT team. Include the exact columns, Excel version, and object settings you checked.
If even a new workbook fails, ask your Microsoft 365 help desk to check the desktop installation. If your subscription includes support, explain exactly how to trigger the error. A picture of the warning alone won't tell them that.
The Short Version
Set object visibility to All, then retry the failed action. If it still fails, inspect traditional notes and other objects in a saved copy, and change the affected item's movement property before altering the rest of the sheet.
Checked November 16, 2026.
 If you have any business, I can build it online