
Disk Utility can format a USB drive on your MacBook Air. Copy important files to another location, then select the external drive, choose Erase, and pick ExFAT for sharing files with Windows or APFS for a modern Mac-only drive.
The key choice comes before you click Erase: select the USB device itself, rather than just the volume inside it. That reveals the partition scheme control and helps avoid formatting the wrong item.
In this guide
1. Connect the USB drive and save its files
Plug the drive into your MacBook Air. Use a suitable USB-C adapter for a USB-A stick if your Mac doesn't have a USB-A port. A USB-C charging cable isn't automatically a data cable, so use the drive's supplied cable when possible.
Open Finder and look under Locations for the drive. Copy its important files to the Mac or another storage device, then open a few of those copies to check that they work. Erasing removes everything on the selected drive.
Don't format a drive just because macOS offers an Initialize button. If it contains files you haven't copied, cancel that prompt and deal with the unreadable drive first.
Formatting gives you empty storage to use; it can't recover the files already there.
I'd unplug other external drives before continuing. It makes the next selection easier, especially when two devices have similar names or the same capacity.
These steps apply to Intel-based MacBook Air and Apple silicon models. For an ordinary external USB drive, you don't need macOS Recovery or a different way to start either model.
For ordinary file browsing before erasing anything, learn the Air's Finder and saving controls with a practice document.
2. Show the device in Disk Utility
Open Finder > Applications > Utilities > Disk Utility. Alternatively, press Command-Space, type Disk Utility, and open the matching app.
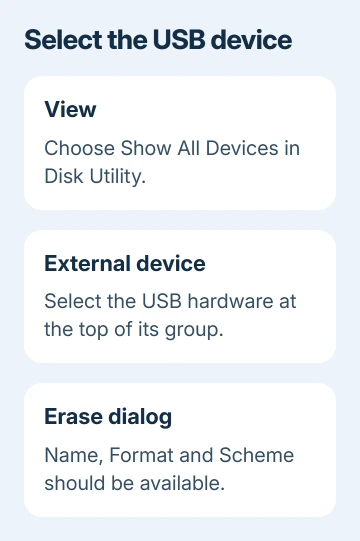
Choose View > Show All Devices. The sidebar now shows physical storage devices and the volumes inside them. Under External, select the USB device that contains the volumes shown for your drive.
Check the device's name and capacity against the stick you connected. Leave the internal Apple SSD and Macintosh HD alone. The external device might have a maker's name even when Finder showed a name such as BACKUP.
Click Erase in the toolbar. Apple's Disk Utility erase procedure says to use the device at the top of the group so the dialog includes a Scheme menu.
If Scheme is missing, cancel the dialog and select the parent device in the sidebar. Selecting only a volume gives you a different set of choices. You don't need an advanced menu; Scheme appears when you select the device.
3. Choose the format for the devices that will use it
The Format menu controls which computers can use the drive and which storage features it supports. Decide where the drive will go after the MacBook Air, rather than choosing a format just because it appears first.
Choose ExFAT for a USB drive used to exchange ordinary files between a Mac and Windows. It's a useful choice for large videos and other files that won't fit within FAT32's single-file limit.
Choose APFS for a drive that stays with Macs running macOS High Sierra 10.13 or later. Windows doesn't offer normal built-in APFS access. For an older Mac, check its macOS version before choosing it.
Choose Mac OS Extended (Journaled) when an older Mac or a specific piece of software requires it. Choose what that Mac or software needs, even if another format sounds newer.
Choose MS-DOS (FAT) when the destination device specifically requires FAT32. Cameras, car stereos, and other equipment can have their own format and capacity limits. Check that device's manual before erasing the stick.
The FAT32, exFAT, and NTFS comparison explains the large-file limit and Windows choices. You don't need a separate formatting app to create an ExFAT drive on your Mac.
Encryption is a separate choice. APFS (Encrypted) adds password protection for compatible Macs. Keep that password somewhere safe; choosing encryption doesn't make APFS readable on an ordinary Windows installation.
4. Set the scheme, erase, and check the result
Enter a short, recognizable name in Name. For a modern Mac-only drive, select GUID Partition Map in Scheme. That scheme supports Macs with Intel processors as well as Apple silicon.
For a drive intended for broad Windows compatibility, Master Boot Record is another scheme available in Disk Utility. Some newer Windows computers also support GUID. A TV or other appliance may specify its own requirement.
The scheme and format are different settings. ExFAT controls how files are stored; GUID or Master Boot Record controls how the disk is divided into partitions. Choosing ExFAT alone doesn't settle every appliance compatibility question.
Click Erase, let Disk Utility complete its work, and click Done. The newly named volume should appear under the external device in Disk Utility and under Locations in Finder.
Copy a small file onto it, open that file from the drive, then eject the volume with Finder's eject button. Reconnect it to confirm your copy remains readable. Test it on the other intended computer before using it to move important files.
When the USB drive doesn't appear or Erase fails
If the device is absent even with Show All Devices selected, check its cable, adapter, and power connection. Try a direct connection instead of a hub where possible. A formatting command can't repair a connection the Mac can't see.
For a visible drive that reports errors, First Aid in Disk Utility checks its storage structure. Run it on the drive's volumes first, then any containers, then the device itself.
Write down the exact error if Erase or First Aid fails. An unreadable disk, a device that won't unmount, and a drive that disconnects during writing need different next steps.
Repeating Erase without reading the error won't tell you which one applies.
If the drive isn't visible on another computer either, ask its maker about replacement or warranty service. For missing files, ask a recovery service about retrieving them before trying further writes.
When several accessories fail on the same Mac, the Mac USB and Thunderbolt port checks help separate a drive problem from a port problem. Tell Apple Support which Mac you have and how another accessory behaved.
The Short Version
Back up the USB drive, open Disk Utility, and choose View > Show All Devices. Select the external device, click Erase, and choose the format and scheme for its destination. Finish with a file-copy check and eject it safely.
Checked November 12, 2026.





