
You have a USB stick in one hand, a PC in front of you, and files you do not want to lose. Maybe it has been years since you used one. Maybe this is the first time.
That is fine, and none of it is hard. I will take it in five steps, in the order you will do them.
The last step is the one people worry about, taking it out. I checked what Microsoft says about that, and its own support pages do not agree with each other. You will see both.
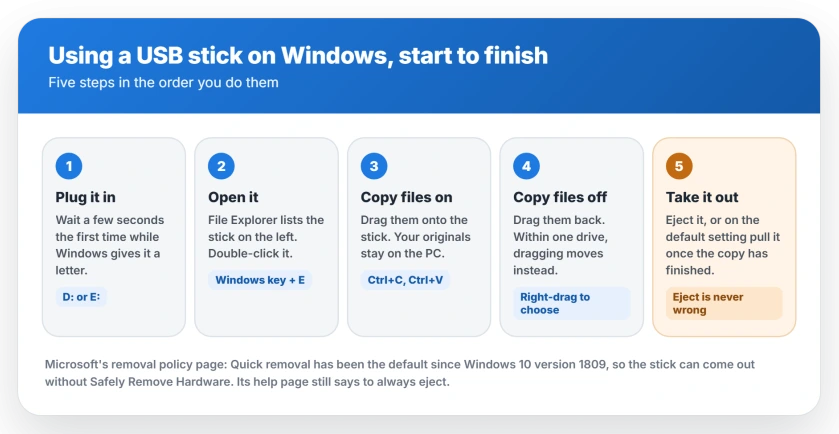
1. Plug it in and wait a few seconds
The stick goes into a USB port on your PC or laptop, where the flat rectangular ports are USB-A and the small oval ones are USB-C.
If it will not go in, turn it over. A USB-A plug only fits one way up, and it is easy to try the wrong side first.
Give Windows a few seconds the first time, while it sets the stick up and gives it a drive letter, such as D: or E:.
A notification may pop up in the corner offering to open it, and you can click it or ignore it and use step 2.
2. Open it in File Explorer
Press the Windows key and E together, or click the folder icon on the taskbar, to open File Explorer.
Your stick is listed on the left, with its letter. Microsoft's own example of how it looks is "USB Drive (D:)". Some sticks show the maker's name instead.
Double-click it to see what is on it. A new stick is usually empty.
Want it to open by itself every time? Microsoft's route is Start, then Settings, then Bluetooth & devices, then AutoPlay. Make sure AutoPlay is on, then pick what happens for removable drives.
3. Copy your files onto it
Open a second File Explorer window at the files you want. Then drag them onto the stick's window.
Dragging from your PC to a stick copies. Your originals stay exactly where they were.
Prefer the keyboard? Select the files and press Ctrl and C. Open the stick, then press Ctrl and V to paste.
There is one more route. Right-click a file, choose Show more options on Windows 11, then Send to, and pick your stick.
Let the copy window finish before you do anything else, because a big folder can take several minutes on a cheap stick.
4. Copy files off it
It works the same way in reverse. Drag from the stick to a folder on your PC, and you get a copy.
Watch for one trap. Dragging between two drives copies, but dragging within the same drive moves the file instead.
To be certain, drag with the right mouse button, and when you let go, Windows asks whether to copy or move.
5. Take it out, and why the rule changed
For years the rule was simple. Always eject first, or you might lose files.
Microsoft changed the default in Windows 10 version 1809, back in 2018. Microsoft states it on its removal policy page: "Beginning in Windows 10 version 1809, the default policy is Quick removal."
Quick removal "manages storage operations in a manner that keeps the device ready to remove at any time." Then comes the line that ends the old rule: "You can remove the device without using the Safely Remove Hardware process."
So on a PC left on its default setting, a stick that has finished copying can come straight out.
Yet Microsoft's everyday help page still says: "To avoid losing data, always safely remove hardware devices like USB flash drives or external hard drives before disconnecting them."
Both pages are Microsoft's. My reading, and it is ours: one describes what Windows does, the other gives a rule that is safe on every setting. Ejecting takes two seconds, so I still do it.
How to eject it quickly
In the system tray, at the right of the taskbar, right-click the Safely Remove Hardware and Eject Media icon. If you cannot see it, select Show hidden icons first.
Choose Eject for your stick. Wait for Safe To Remove Hardware to appear, then pull it out.
File Explorer is faster. Right-click the stick in the left pane and choose Eject.
If Windows says the device is in use, take that seriously, because something still has a file open on the stick. Close it and try again.
When the old rule still applies
Some sticks are set to Better performance instead. With that setting, Windows "can cache write operations to the external device."
Microsoft is blunt about it: "If you use the Better performance policy, you must use the Safely Remove Hardware process to remove the device."
To see which one yours uses, right-click Start and select Disk Management. In the lower section, right-click the stick's label, then choose Properties and Policies.
No Policies tab? Select Hardware, pick the removable drive from the All disk drives list, and choose Properties. The tab should appear.
The setting belongs to that stick and that port. In Microsoft's words, it "remains in effect if you disconnect the device and then connect it again to the same computer port."
If Windows will not show the stick
A stick that lights up but never appears often has no drive letter. Disk Management shows it even when File Explorer will not.
A stick that was wiped clean may have no partition at all. From the outside, that looks exactly the same.
On a desktop, try a port on the back as well, since front ports connect through a cable inside the case.
If Windows shows an error, read it word for word. The exact message narrows the cause down.
If a big file will not copy
A single file bigger than 4 GB will not fit on a stick formatted as FAT32. Windows stops and says the file is too large for the destination file system.
That is the format, not a broken stick. Which format you need comes down to one number, and it is the size of your biggest file.
Look after it
Sticks wear out, and cheap ones can die with no warning. Once one stops working, there is usually no repair.
A stick that still opens but suddenly will not save anything is often near the end. Check for a small lock switch on its side first, and if there is none, copy your files off today.
Never keep the only copy of anything on a stick. That rule is ours, and it matters more than anything else on this page.
Status: checked 25 September 2026 against two Microsoft pages that cover Windows 11 and Windows 10. Its removal policy page says Quick removal has been the default since Windows 10 version 1809, and that such a stick can be removed without Safely Remove Hardware. Its Safely remove hardware page still says to always eject. Ejecting is never wrong.
How do I use a USB memory stick on Windows?
Plug it into a USB port and wait a few seconds. Press the Windows key and E to open File Explorer, then double-click the stick in the left pane. Drag files onto it to copy them. When the copy has finished, eject it and pull it out.
How do I open a flash drive on Windows 11?
Plug it in, then open File Explorer from the folder icon on the taskbar. The flash drive appears in the left pane with its drive letter, often as USB Drive. Double-click it to see your files.
Do I need to eject a USB stick before removing it?
On most Windows PCs, you do not strictly need to. Microsoft made Quick removal the default in Windows 10 version 1809 and says a stick on that setting can be removed without Safely Remove Hardware. Its help page still says to always eject, and a stick set to Better performance must be ejected.
Why does Windows say my USB stick is in use?
Something still has a file open on it, such as a document or a photo. Close whatever is using the stick, then eject it again. Pulling it out while a file is open is how files get lost.
Why will a file not copy to my USB stick?
If the file is bigger than 4 GB and the stick is formatted as FAT32, it cannot hold it. Formatting the stick as exFAT fixes that, but formatting erases everything on it, so copy your files off first.
The Short Version
- Plug the stick in and give Windows a few seconds to set it up.
- Press the Windows key and E. The stick is in the left pane of File Explorer.
- Drag files onto it to copy them. Your originals stay on the PC.
- Dragging within one drive moves files. Between two drives, it copies.
- Quick removal has been the default since Windows 10 version 1809.
- Microsoft says a stick on Quick removal can come out without Safely Remove Hardware.
- Its help page still says to always eject, and ejecting takes two seconds.
- A stick set to Better performance must be ejected before you pull it.
- FAT32 cannot hold a single file bigger than 4 GB.
- Never keep the only copy of anything on a stick.
Where to Next
The first time takes longest, because Windows is setting the stick up. After that it is plug in, drag, eject, done.
If an old stick holds family photos, copy them to your PC today. Keep the stick as the spare, not the original.
Stuck on a step, or seeing a message I have not covered? Tell me in the comments what Windows says, word for word, and I will help you with the next move.
And if you are making a stick to reinstall Windows, read this before you make the stick. A reset may do the job without one.

Isaac Smith is the founder and editor of PC Glance, a website that covers computers, laptops, and technology. He is a tech enthusiast and a computer geek who loves to share his insights and help his readers make smart choices when buying tech gadgets or laptops. He is always curious and updated about the latest tech trends.