Curved text in Word uses WordArt with a Transform effect. Insert your words as WordArt, select them and open Shape Format > Text Effects > Transform to choose a curve or circular path.
The Windows and Mac desktop apps have this control. Word in a browser can display existing WordArt, but creating more requires desktop Word, so a missing browser command isn't a problem with your document.
In this guide
1. Put the words into a WordArt object
On Windows, go to Insert > WordArt in desktop Word and choose a style. Word inserts placeholder lettering. Replace it with the heading, badge text or short label you want to curve.
On a Mac, use Insert > WordArt, pick a design and enter your wording. The gallery's sample letter represents a style, not a single letter that you're limited to using.

For text you've already typed, highlight the wording to curve before choosing a WordArt style from Insert. Select just the heading, leaving any paragraphs you want to keep as plain text out of the selection.
I'd start with the shortest wording that makes sense, then set the shape. A long sentence wrapped into a small circle becomes difficult to read, and changing its wording late can undo the balance you've just arranged.
A separate Word text box is useful for a nearby straight caption. It doesn't have to become part of the curved heading, and keeping the two separate makes each easier to position.
2. Apply the curve from Text Effects
Select the WordArt, then open Shape Format. In WordArt Styles, choose Text Effects, open Transform and select the effect that suits the heading. A curved path bends the lettering without turning it into a picture file.
On Mac, select the WordArt and use the same Shape Format > Text Effects > Transform sequence. Some older Office ribbons call the tab that appears when you select WordArt Drawing Tools Format instead of Shape Format.
Microsoft says its curved-text controls use a Transform effect for this task. It changes the lettering's path, so don't substitute the similarly named Shape Effects menu.
Click away from WordArt to view your curve. It's harder to judge the finished heading while you're editing the letters. Keep the surrounding page visible so you can see how the heading fits before changing another setting.
If Transform is missing, confirm that you opened Text Effects. Shape Effects applies to the surrounding object and its background. A narrow Word window can also show icons instead of the full WordArt Styles labels.
3. Fit a circle without squeezing the letters
For a circular heading, select the WordArt and return to Shape Format > Text Effects > Transform. In Follow Path, choose Circle. Drag the object's sizing handles until the path has the size and shape you want.
A wide, shallow object and a roughly square object won't produce the same circular arrangement. Adjust the object's dimensions while watching the result, then click outside it to check the spacing around the full path.
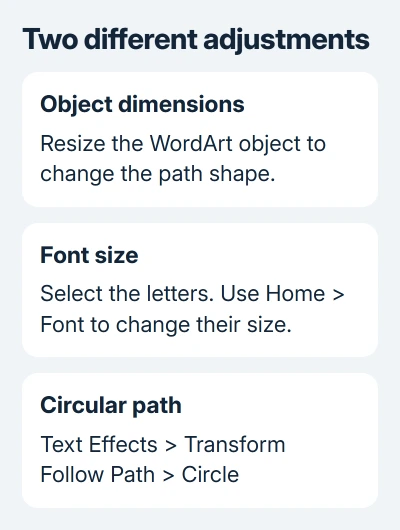
Change the font separately when the letters are too large for that path. Select the WordArt text and use Home > Font to choose its size and style. Making the object larger isn't the same operation as selecting larger lettering.
For a short heading, try the curve choices rather than forcing a few words to fill an entire circle. For wording around a circular picture, give the text enough room that the picture doesn't touch the letters.
The Rotate control turns the whole object on the page; it doesn't choose a new curved path. Set the curve first, then rotate the heading to tilt it relative to the page or another shape.
If your WordArt sits in a canvas with gray controls, check Word's canvas alignment limits before dismantling the drawing.
Keep the heading editable while arranging the page
Click into the WordArt to correct the wording. Select the whole object when you want to move it. The text cursor lets you edit the letters; selecting the whole object lets you move it, even though you click in the same area for both.
Check the entire phrase after editing. A longer word can leave the curve crowded even when the old wording fit well. Revisit the font size or object dimensions instead of leaving squeezed text on a small badge.
For a heading and a separate picture that should travel together, use the Word object grouping steps after their positions are settled. Grouping keeps them in position relative to each other when you move them together.
Keep an editable document copy before turning the finished design into an image for another app. A picture of the words won't give that app the same editable text and Transform controls.
For text following the straight sides of a rectangle, use separate WordArt objects for the separate edges. A circular Transform won't make one text object follow all four straight sides and corners.
For a straight heading in a worksheet, stretch Excel WordArt with Warp to change letter height or width independently.
What can Word in a browser change?
Browser Word can show WordArt that already exists in a document. It also provides ordinary font changes, including size and color, through Home. It still doesn't have the desktop command for inserting another WordArt object.
Switch this file to desktop Word to add WordArt or access the curved-text tools. Save the changes, then return to its browser view and check how the saved design appears.
Don't replace a missing Transform command with ordinary paragraph alignment. Centering a line only changes where that straight line sits; it doesn't bend the words. Use the desktop app when you need curved text.
Without desktop Word, keep the heading straight or use a graphics app for curved lettering. Insert its result as a picture. Word will then place finished artwork rather than edit the original letters.
Check the final page before sharing it
View the completed page at the zoom you'd normally use to read it. Check the spaces between letters, the gap around any picture and whether the heading covers nearby text. The effect should make the wording easier to recognize.
Use plain document text for essential details such as dates, instructions and contact information. A decorative curve works well for a short heading, while a long instruction usually reads better on a straight line.
For a design that changes on another computer, compare desktop and browser Word first. When reporting a missing Transform command to Microsoft Support, include a small sample file and give your Word version.
For more complex artwork that Word's presets can't shape accurately, prepare it in a drawing program and place the finished design into the document. Keep the editable source so a later spelling change doesn't require rebuilding the design.
The Short Version
Insert WordArt and choose a Transform from Text Effects. For circular lettering, select Circle under Follow Path. Adjust path dimensions and font size separately. Creating new WordArt requires desktop Word.
Checked November 10, 2026.
 If you have any business, I can build it online